|
HandyShopper User's Guide: Menus and More
As you may have discovered, HandyShopper is much more than "just" a shopping list program. While it was designed to be the most powerful and flexible shopping list program for the Palm OS platform, its success in that endeavor has also made it powerful and flexible enough to be used for hundreds of unique purposes. With all this power and flexibility comes a lot of options and preferences. These are used to control how the list in use, or the program itself, performs tasks and displays information. This section will define all the various preference options, screen settings, and other switches and buttons in the program.
Context Menu
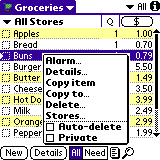
The Context menu is a quick way to access often used functions for particular items that cannot be placed in a column of data like most everything else. To access this menu, simply tap and hold the stylus down on an item for about a second (it's actually about half of a second) and the menu will pop up under where you tapped (Figure 2.13). You can then choose from the following seven functions:
Figure 2.13
Figure 2.14
Figure 2.15
- Alarm: This provides direct access to the Alarm setting screen for the item you tapped on. There will be more on the Alarm Setting screen later.
- Details: This provides direct access to the Details screen for the item you tapped on. There will be more on the Details screens later.
- Copy item: This will create an exact duplicate of the selected item and place it just below the current item. Every bit of data associated with the original will be copied to the new one with one invisible exception: the entry order. The entry order number assigned to the item will place it at the end of your list if you were to sort it by entry order (or at the beginning if sorting in reverse). Since entry order cannot be edited in HandyShopper, be sure to keep this in mind when making copies of items in a list which you sort using the entry order.
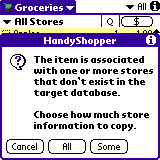
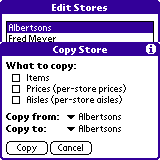
- Copy to...: This allows you to make an exact duplicate of the selected item and send it directly to another HandyShopper list on your device. Upon selecting this option, you are presented with a list of your HandyShopper databases. Choose the list database to copy the item to, and you are then given the choice to copy all or some of the store information (Figure 2.14). Choosing All will copy the item and all store information, adding any missing stores to the target database. Choose Some will copy the item and as much store information as possible, without adding any new stores to the target database. Tapping the button of your choice will complete the function and return you to your list, and tapping the Cancel button will return you to your list with no action taken.
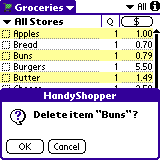
- Delete...: Choosing this funtion will allow you to delete the selected item. When you do, a confirmation will pop up asking if you're sure you want to delete the item (Figure 2.15). Tapping OK will delete the item and return to the list, and tapping Cancel will cancel the operation and return to the list.
- Stores...: Choosing this function will pop up the stores screen for the selected item. You can then perform any action available on the stores screen such as assign the item to one or more stores, enter prices and/or aisles for the item in each store, and even move to the Edit Stores screen to modify, create, and delete stores.
- Auto-delete: Provides quick access to the Auto-delete flag for the item. If this option is checked, then the item will be deleted from the database when the Checkout function is run. Tapping this option in the Context menu toggles between checked and unchecked. If it was empty, and you tap on it, then the next time you look at the context menu for that item, it will be checked. You can also see the status of this flag in the Details screen for the item.
- Private: Quickly mark or unmark the item as Private. This works just like the Auto-delete flag, and can also be set or seen in the Details screen.
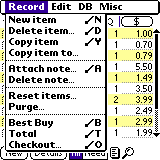
The Record Menu
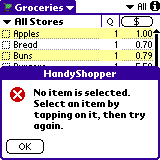
Menus in HandyShopper are accessed the same way as in other Palm OS applications, simply tap the menu icon in the silkscreen/graffiti area of your device and the first menu will drop down for your convenience. Other menus can be shown by tapping their name in the menu bar that appears at the top of the screen. The menus in HandyShopper offer as many functions as the Preferences and other screens do, so I'll take them one at a time, starting with the first and left-most menu, the Record menu (Figure 2.16). Note that for the first five items in the menu, you must have an item selected by tapping the item description before accessing the menu. If there is no item selected when you access these functions, an error message will pop up reminding you to select an item first (Figure 2.17)
Figure 2.16
Figure 2.17
- New Item: An alternate method of creating a new item. This menu command is especially helpful to users with Palm Powered devices with built-in or connected keyboard, eliminating the need to tap the screen when creating new items by being able to use the command shortcut of /N.
- Delete item...: Choosing this function will allow you to delete the selected item. When you do, a confirmation will pop up asking if you're sure you want to delete the item (Figure 2.15). Tapping OK will delete the item and return to the list, and tapping Cancel will cancel the operation and return to the list. You can also access this function by writing the command stroke (a forward slash: / ) then the letter D.
- Copy item: This will create an exact duplicate of the selected item and place it just below the current item. This command can also be run by writing the graffiti command stroke / and Y. Just as with the Context Menu discussed above, the entry order number for the copied item will be last in your list of items.
- Copy item to...: The same as for the Copy to... function in the Context menu, this will allow you to copy an item to another list on your device. The same options for copying store information are presented. This function does not have a command stroke.
- Attach note...: Choosing this allows you to go directly to the note editing screen for the item, bypassing the Details screen where the Note button resides. You can also write the command stroke / and A to add the note. Items with no text in their note field look like any other item, while items with information in the note field will have a small note icon to the right of the item description. Tapping on the note icon will switch to the note editing/viewing screen.
- Delete note...: Choosing this will delete the note that is attached to the selected item. A simple confirmation message will pop up asking if you're sure you want to delete the note. Tapping OK will delete the note and return to the list, while tapping Cancel will return to the list without deleting the note.
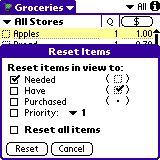
Figure 2.18- Reset items...: The Reset Items function (Figure 2.18) is a fast and powerful way to manage the status of items in a large list. While these things can be done by tapping the status of each item in a list, doing so quickly becomes tedious for lists longer than a page or two. To make the process faster and easier, HandyShopper offers the ability to reset the status of all the items in a view to a particular status, or to even change the status of every item in the database. You can set the items in the current view to Needed, Have (checked off), Purchased (dot), or even to a particular priority selection. These choices will effect the chosen changes to all the items in the current view (All/Need, store, and category selection). You can also have the changes applied to every record in the entire database by checking the "Reset all items" option. After you have made your choices and tapped OK, HandyShopper will commence making the changes. You will not be able to cancel the process once it has begun, and a "Working" progress bar will appear during the process. When the process is complete, HandyShopper will announce how many items it has reset. This can be used as a nifty way to count how many items are in your database, as long as changing the status or priority of all your items is not detrimental to the functionality of your list.
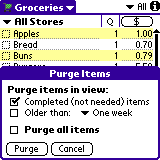
Figure 2.19- Purge...: The Purge items function (Figure 2.19) allows you to automatically delete items from the current view based on their date or status, irrelevant of their Auto-delete status. If "Completed (not needed) items" is chosen, then all items in your current view with the checked box status indicator will be deleted. Of course, there is a confirmation screen before the action is taken, to provide one last escape from the function (like if you're not in the view you want to delete items from). After the purge process is finished, an announcement of how many items purged will appear for you to confirm. You can also choose to purge items based on the date assigned to the item. This can be a fast way to clear out a long To Do list kind of list. You can choose to purge items older than one week, one month, or even select a date from the calendar to serve as the cutoff. Keep in mind that if you have not recorded item creation date, completion date, or assigned dates to any items, nothing will be purged, since nothing is technically old. Finally, you can choose to purge all items. There are no choices for this option. If you select it, then all items will be purged upon confirmation, no matter what their status or date is. If you want to start a new list based on the structure of another, purging all the items is an easy way to do that (after you make a copy of the list, of course).
Figure 2.20
Figure 2.21
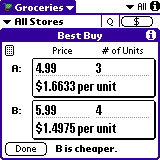
Figure 2.22- Best Buy: The Best Buy feature provides a quick and easy way to compare unit prices between two items. While this is just a specialized calculator, and the data is not stored after leaving the Best Buy screen, it's very useful to have. When you choose Best Buy from the Record menu, or write the command stroke and B in the graffiti area, a window will pop up with four fields, price and quantity for each of two items (Figure 2.20). To use it, simply enter the price and quantity for each item in the spaces provided. As you do so, HandyShopper automatically calculates the unit cost of each item, and tells you which item is a better buy based on the unit price.
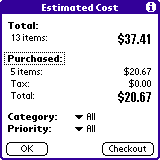
- Total: Need to know how much your shopping trip is going to cost you? The Total screen, also called the Estimated Cost screen (Figure 2.21), will show you the total calculated price of all the items on your list, as well as all the items in your cart (checked off). The Estimated Cost screen also displays the number of items on your list, and in your cart, the calculated tax, and total with tax. You can even limit the calculation to a particular category and/or priority. Top it off by the convenient addition of a Checkout button.
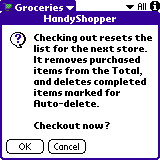
- Checkout...: The main purpose of the checkout command is to reset the checked off items to purchased status so that they are not included in any future cost estimates. After you finish making your purchase at one store, it's best to run the checkout command before going to the next store. You can run the checkout command by tapping on the item in the Record menu, writing the graffiti command stroke /O ("oh" not zero), or by tapping the Checkout button on the Estimated Cost screen. Checking out not only resets items to purchased (dot) status, but it also deletes items marked as Auto-delete. Upon choosing the checkout function, a confirmation message appears (Figure 2.22). Tapping OK will run the checkout command, and tapping Cancel will return to the list view with no changes.
The Edit Menu
This one is pretty straight forward, with many of the commands you're already familiar with in other applications, and even desktop computer programs. Accessing this menu is the same as any other program menu. Tap the menu silkscreen button in the lower left of the graffiti area, or tap the title bar on Palm OS devices running Palm OS 3.5 or higher. Figure 2.23 shows the Edit Menu.
Figure 2.23
- Undo: Undoes the most recent command, including cutting, pasting, and changing the status of an item, even editing the other fields of data for items. The command stroke for this function is /U.
- Cut: Cuts the selected text. Cutting essentially copies the text to the clipboard and deletes it from the current location. You can then paste the information into any other field as many times as you like, until you cut or copy something else into the clipboard. The command stroke for cut is /X.
- Copy: This will copy the selected data to the clipboard for future pasting. The command stroke is /C.
- Paste: This will paste the information from the clipboard into the location of the cursor. Be sure to tap an item or select the location for information to be pasted to, or a new item will be created. This can be useful as well, if you're aware that it happens (which I was not, until I just tested it ;-). The command stroke for this is /P.
- Select All: Choosing this item in the Edit menu, or entering the graffiti command /S, will select all the information in the most recently tapped field. This works only for the item description and custom text fields. Usually this is done to make it easier to cut or copy text.
- Keyboard...: Choosing this, or writing the command stroke /K will bring up the keyboard text entry dialog, just as if you were to tap the little "ABC" icon in the bottom left of the graffiti entry area. This allows you to enter and edit text with the on-screen keyboard, which also makes it easier to enter special characters by choosing the 123 or Int'l keyboards.
- Graffiti...: This selection, or the /G command stroke, will bring up the Graffiti help screens to remind you of a graffiti stroke you might have forgotten.
The DB Menu
The DB menu (Figure 2.24) offers all the necessary database management commands as well as a couple quick sorting commands. The only one missing is a Copy Database feature... but maybe someday. ;-)
Figure 2.24
Figure 2.24.1
Figure 2.24.2
Figure 2.25
Figure 2.26
Figure 2.27
Figure 2.28
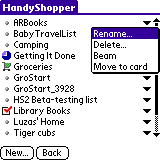
- Databases...: This brings up the database management screen (Figure 2.24.1), which is a simple list view of all the installed HandyShopper databases (lists) on your device with access to list management features such as Rename, Delete, Beam, and Move to/from Card. Tapping a list name in the Databases screen will open that list. Tap the Back button to return to the previously open list. You can also create a new database from there by tapping the New... button. Another way to open a database is to tap the small white triangle in the title bar of HandyShopper, where it shows the name of the list you're currently viewing. Tapping the triangle (just to the right of the list name) will drop down a list of all your installed databases. Tapping on a list name opens that list. If you have a lot of databases, you can scroll through the list with the hardware scroll buttons to find the list you want to open. The graffiti command stroke /E will also run this function. Learn more about the Database Management screen below.
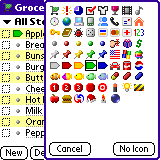
- Choose Icon...: Once you've created your list, you can still change the list icon by choosing this menu option. Tapping it will bring up the icon choose (Figure 2.24.2) so that you can pick a new icon to represent your list.
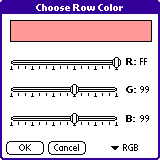
- Choose Row Color...: In the latest version of HandyShopper, you can select the color that HandyShopper uses for alternating rows of data in list view. This only works for Palm OS devices running Palm OS 3.5 or higher. This is because OS 3.5 was when built-in support for color and grayscale was included. On devices without color or grayscale support in the OS, choosing this item will result in a message that tells you that you need OS 3.5 or higher and at least 16 grays or colors. If you have a supported device, when you select this function, you'll be given a palette to select your color from (Figure 2.25). You can also choose your color with RGB controls (Figure 2.26) by choosing RGB from the small drop-down menu in the lower right corner (which has Palette chosen by default), but choosing a color with the Palette is much easier for most people. Once you've chosen your row color, your list will be drawn with the color you chose as the background color for every other row, starting with the top row (Figure 2.27).
- Security...: Brings up a small dialog which allows you to choose how you would like the OS to deal with private records. Think of it as a back door to the Security application that is built into the Palm OS. Choosing to Show Records will make private records visible. If they had previously been masked (in OS 3.5 and higher) or hidden, you will be asked for your password (if it has been assigned in the Security application). Choosing to Mask Records (again, only in OS 3.5 and higher) will cover private records with a gray stripe, blocking all record contents, but allowing you to see that there is a private record there. Choosing to Hide Records will make all private records disappear from view. Each selection is followed by a confirmation message allowing you to confirm your selection or back out.
- Sort by Name: A "quickie" way to change the current sort order to sort ONLY by item description. Keep in mind that this will permanently (well, until you go back in and change them in the Sort Preferences again) change the sort order to a primary sort of Description from A to Z, with no secondary or tertiary sort orders. If you had a complex sort order setting, it's a good idea to never use the Sort by Name function, because to get your fancy sort order back, you'll have to go back into the Sort Preferences and edit them.
- Sort by Aisle: A "quickie" way to change the current sort order to sort ONLY by the aisles assigned to the items in the current store. Again, keep in mind that this will permanently change the sort order to a primary sort of Aisle from A to Z, with no secondary or tertiary sort orders. If you had a complex sort order setting, it's a good idea to never use the Sort by Aisle function, because to get your fancy sort order back, you'll have to go back into the Sort Preferences and edit them.
- Edit stores...: This brings up the Edit Stores screen, from which you can create, rename, and delete stores, as well as copy information from one store to another with the Copy button. Tapping the Copy button brings you to a nifty little screen (Figure 2.28) that lets you copy per-store information from one store to another. You can copy the item assignments, the prices for items, or the aisles for items, or any combination thereof. You then choose which store to copy the information from, and which store to copy the information to, and tap OK. This can be a useful feature for a number of purposes, not the least of which would be adding a store in the same chain at a new location.
The Misc Menu
All the things that didn't really fit in the other menus, but are incredibly useful none the less. That's what the Misc menu (Figure 2.29) is all about. Really, this one should be called "Goodies" or something. ;-)
Figure 2.29
- Preferences...: Sure enough, tapping this item in the list will bring you to the Preferences screen. It will automatically open the Preference screen that you most recently used. So, if you've changed the View Preferences recently, that will be the Preferences section that opens. Refer to the sections above for what all the various Preferences do.
- One-handed mode: This enables the special mode that allows you to manage your list with the hardware buttons of your Palm OS device. By default, you can enable One-handed mode by choosing this menu command, but you can also write the graffiti command stroke /Z, draw a line from your graffiti area to the top of the screen, press the contrast button on a PalmV or Vx device (and some other devices with dedicated contrast buttons), or press the jog wheel/dial on devices that have them. To exit One-handed mode, simply tap anywhere on the device's screen. The main features of the mode are the new assignments for main hardware buttons. In One-handed mode, the hardware buttons function as follows: Datebook button (first from the left) moves up the list one screen (like scrolling up) which also places the item selection on the center item on the screen; Address button (second from the left) moves down the list one screen (also moving the selection to the center item on the screen); Up and Down scroll buttons move the item selection up or down one item; ToDo button (second from the right) checks off the item that is selected; and the Memo button (furthest to the right) undoes the last command, such as checking off an item by mistake; Jog wheel Up and Down move the item selection up or down one item; Jog wheel press checks off the item that is selected. Remember that as soon as the screen is touched, such as to enter the price or aisle for an item, One-handed mode is automatically disabled. One-handed mode does remain enabled through power cycling. So if you're shopping but haven't performed an action soon enough and the device turns off, when you turn it back on with the power button it will still be in One-handed mode.
- Import from MemoPad...: This allows you to quickly create a list of items by importing a Memo Pad entry. There is a specific format that items need to be in to import more than just the item description, and only a few fields of data can be imported. It's much too complex for this section of the guide, though. If you're interested in learning more on importing data from the Memo Pad, please refer to the (under construction) section "99_ExcelSpreadsheet.html"
- Export to MemoPad...: This allows you to export the currently viewed list of items to a Memo Pad entry. Only a few fields of data for each item are exported, though. Please refer to 99_ExcelSpreadsheet.html for more information.
- Import from 1.x...: This is a feature useful to those who had been using an older version of HandyShopper before installing the current HandyShopper. When HandyShopper 1.7 has been used, there is a database of information the user would like to keep. By installing HandyShopper BEFORE deleting HandyShopper 1.7, the user can run this command to import all their data from the old version. After the data has been imported, a new list in HS3 called "Data from 1.x" is created. This can then be renamed using the Rename database command explained above. HandyShopper 1.7 can then be safely deleted from the device, and HandyShopper can be used in its place, with all the added features it offers.
- How to use...: This command will bring up a quick tutorial on how to use HandyShopper. It's essentially just explaining that to use HandyShopper, you must create items, mark them as needed, switch to the Need view, and go shopping. The Getting Started section of this guide has much more in depth information on how to use HandyShopper.
- About...: This displays the About screen for HandyShopper. The About screen contains the version information (build number and date) as well as copyright information and the ability to get even more information by tapping the info (i) icon, which then displays the author's snail mail and e-mail addresses, to send him a post card and/or a suggestion, respectively.
The Extra Menu
The Extra menu is a little known menu of features that can be very useful when needed. The only way to get this menu is to access the menu bar while viewing one of the HandyShopper Preferences screens. Once you're viewing a preferences screen, tap the menu silkscreen button as usual, and the menus will appear. The first menu that appears is an Edit menu, with all the same options as the regular Edit menu detailed above. The next menu is called "Extra" (Figure 2.30) and contains the following options:
Figure 2.30
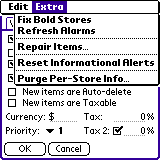
- Fix Bold Stores: Sometimes HandyShopper will miscount the number of items needed and which stores they've been assigned to. Normally, when you drop down the stores pick list, any store with an item marked as needed assigned to it will be bolded, and stores with no needed items will be normal text. If this feature seems to be working improperly, you can run the Fix Bold Stores command to have HandyShopper double-check those counts and fix them if they are off. The symptom is usually a bold store that shouldn't be.
- Refresh Alarms: If you think HandyShopper is not properly activating alarms that you've set, it might be because it doesn't know which one is next. This function will tell HandyShopper to scan all the list databases for alarms, and decide which one is coming up next. Alarms should function properly after this function is run.
- Repair Items...: On even rarer occasions, items in HandyShopper can become damaged, usually by having inappropriate store assignments, like after deleting stores an item belongs to, and recreating them, and complex tasks like that. If you think there might be some items that are causing problems with list displaying and editing, you can run the Repair Items command to have HandyShopper double-check each item to make sure the data is accurate and appropriate. After running the command, HandyShopper will notify you how many, if any, items it found and repaired.
- Reset Informational Alerts: This resets any of the alert messages that you've told HandyShopper "Don't show me again" such as the alert that appears when you first switch between All and Need views when using separate sort orders for All and Need (explained above in Sort Preferences). If you've told HandyShopper not to bug you about things like that, you can use the Reset Alerts function to have them reappear if you like.
- Purge Per-Store Info: This will permanently delete all the per-store price and aisle information in the database for the list that is currently open. I'm not sure why someone would want to do this, but maybe when moving to another city or country, or creating duplicate lists that are likely to have different price and aisle data, I don't know. Just remember, if you run this command, there goes all the per-store prices and aisles... bye bye. :)
The Actions Popup
The Actions popup is a convenient little menu for some often used database and item functions. It has two modes. When there are no items in the list selected, the Actions popup is rather short (Figure 2.31). With an item selected, there are a few more options available in the Actions popup (Figure 2.32), which are actually the same items available in the Context menu described above.
Figure 2.31
Figure 2.32
- Preferences...: Sure enough, tapping this item in the list will bring you to the Preferences screen. It will automatically open the Preference screen that you most recently used. So, if you've change the View Preferences recently, that will be the Preferences section that opens. Refer to the sections above for what all the various Preferences do.
- Sort...: This will take you directly to the Sort Preference screen, no matter what Preferences screen you might have recently been viewing. This is helpful when needing to modify your sort orders without having to end up at another Preferences screen. It only saves one tap, but when you're in a hurry, you're in a hurry. ;-)
- Databases...: This brings up the database management screen (Figure 2.24.1), which is a simple list view of all the installed HandyShopper databases (lists) on your device with access to list management features such as Rename, Delete, Beam, and Move to/from Card. Tapping a list name in the Databases screen will open that list. Tap the Back button to return to the previously open list. You can also create a new database from there by tapping the New... button. Another way to open a database is to tap the small white triangle in the title bar of HandyShopper, where it shows the name of the list you're currently viewing. Tapping the triangle (just to the right of the list name) will drop down a list of all your installed databases. Tapping on a list name opens that list. If you have a lot of databases, you can scroll through the list with the hardware scroll buttons to find the list you want to open. The graffiti command stroke /E will also run this function. Learn more about the Database Management screen below.
- Alarm...: This provides direct access to the Alarm setting screen for the item you tapped on. There will be more on the Alarm Setting screen later.
- Details...: This provides direct access to the Details screen for the item you tapped on. There will be more on the Details screens later.
- Copy item: This will create an exact duplicate of the selected item and place it just below the current item. Every bit of data associated with the original will be copied to the new one with one invisible exception: the entry order. The entry order number assigned to the item will place it at the end of your list if you were to sort it by entry order (or at the beginning if sorting in reverse). Since entry order cannot be edited in HandyShopper, be sure to keep this in mind when making copies of items in a list which you sort using the entry order.
- Copy to...: This allows you to make an exact duplicate of the selected item and send it directly to another HandyShopper list on your device. Upon selecting this option, you are given the choice to copy all or some of the store information (Figure 2.14). Choosing All will copy the item and all store information, adding any missing stores to the target database. Choose Some will copy the item and as much store information as possible, without adding any new stores to the target database. Tapping the button of your choice will complete the function and return you to your list, and tapping the Cancel button will return you to your list with no action taken.
- Delete...: Choosing this funtion will allow you to delete the selected item. When you do, a confirmation will popup asking if you're sure you want to delete the item (Figure 2.15). Tapping OK will delete the item and return to the list, and tapping Cancel will cancel the operation and return to the list.
- Stores...: Choosing this function will popup the stores screen for the selected item. You can then perform any action available on the stores screen such as assign the item to one or more stores, enter prices and/or aisles for the item in each store, and even move to the Edit Stores screen to modify, create, and delete stores.
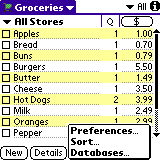
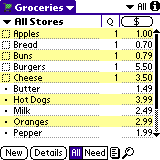
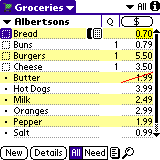
List View Screen
The List View is where most of the work is done. This is your list of all your items to keep track of, and can look very different from the example (Figure 2.33) depending on which columns are chosen for display. The only columns that cannot be turned off are the Checkbox and item Description columns. Using the ability to resize the columns, you can cram about half of the available columns on the screen at once. Anyway, here's a rundown of what all is on the List View Screen (besides all the various column combinations possible).
Figure 2.33
Figure 2.33.5
- List Name: In the top left corner of the HandyShopper screen, instead of the name of the program as in many other applications, HandyShopper shows you the currently open list. With this indicator, you'll always known what list you're looking at. In Palm OS versions since 3.5, you can tap on the list name (program title area) to drop down the program menus.
- List Chooser: Immediately to the right of the list name is a small white triangle. Tapping this little triangle will drop down a list of all installed HandyShopper lists. Simply tap on the name of the list you want to open, and it will be opened. This is a fast and easy way to open another list to manage, rather than going through the "Databases..." function. Note that lists on an expansion card will show a little "chip" icon instead of its assigned icon. This way you know it's on the card and will take a few extra seconds to open.
- Category: Similar to other Palm OS applications, HandyShopper has a category selector in the top right corner of the screen. Categories are list specific, so the available categories will depend on the current list. In all lists, though, the following selections will be available: "All" so that you can view all items regardless of category; "Unfiled" so that you can view items that are not assigned to a category; and "Edit Categories..." that takes you to the Edit Categories screen where you can create, rename, and delete categories for the list you're using.
- The little "i": This "More Information" button is present in many places in HandyShopper. Here is leads to tips that describe how to get to the menus, preferences, stores, our user group, and one-handed more, including what the buttons do when in one-handed mode.
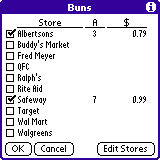
- The Stores chooser: This lets you choose which store to view your list items in. Items assigned to the store you choose will be shown in the list, and items not assigned to that store are filtered out of the view. Stores are list specific, so the available stores will depend on the current list. In all lists, though, the following selections will be available: "All" so that you can view all items regardless of store assignment; "Unfiled" so that you can view items that are not assigned to any store; and "Edit Stores..." that takes you to the Edit Stores screen where you can create, rename, and delete stores for the list you're using, as well as move to the Copy Store screen to copy item assigments, prices, and aisles from one store to another.
- Drag resizable columns: Columns that can be resized have a vertical line immediately to the left of the column title/header. Tap and hold on this line while moving the stylus to the left or right to drag the line, thus widening or narrowing the column. With this feature, you can make as many columns fit on the screen as you want, or even make other columns very wide. This is especially useful when using the Custom Text field as an additional data field for your list items, because now it can be as wide as the description field, or wider. :)
- Total Button: The total button appears only at the top of the Price column. If the price column is not showing, then the button will not appear. This is just a shortcut to the Estimated Cost (Total) screen. Even with the price column hidden, you can still get the Estimated cost screen via the Record menu, or command stroke /T. The Estimated Cost screen shows a variety of information, described above in the section on the Record Menu
Figure 2.34- The scroll bar: The HandyShopper scroll bar works like most other scroll bars: Tap the arrows at the top or bottom to scroll up or down one item; tap directly above or below the scroll bar handle to move up or down one page; and tap and drag the scroll bar handle to move quickly through the entire list. That's great by itself, but the best part is that HandyShopper can show you where you're going to end up before you go there. If you turn on the "Show tip window when scrolling" in the Misc Preferences screen, HandyShopper will show you a floating status window on the screen (Figure 2.34). Tap and HOLD the stylus on the scroll bar handle, and you'll see the tip window appear on the screen next to your stylus position. This window shows you the item that you'll be jumping to. You can drag your stylus up and down the scroll bar and the tip window will show you the item closest to your position on the scroll bar. As soon as you lift the stylus, the view will jump to that part of the list, with the item you saw as close to the third item in the list as it can be (in case you wanted an item or two above or below the one chosen. The size and items in the scroll bar depends on the current view filters (category, store, all/need) and shows items in the order that the list is sorted. You'll also notice that the tip window also shows you other information besides the item name. What HandyShopper is showing you is the primary sort definition, and then the item description. For example, if your list is sorted by category first, it will show "Cat: category" and then the item status and description. This is a great way to jump to a particular section of your list without having to do a lot of scrolling or re-sorting. It's also a fast way to get to the very top or bottom of your list. Interestingly, if your primary sort setting is Description, then the scroll bar will show the secondary sort setting if there is one, followed by the description. Play around with the tip window feature, and you'll find that it's much better than a normal scroll bar. You can still scroll one page at a time with the hardware scroll buttons. The scroll bar, as well as the entire HandyShopper application, is "Lefty" aware. If you install the Lefty program and tell it that you prefer a left-handed GUI, HandyShopper (and other Lefty aware programs) will place the scroll bar on the left side of the screen. :)
- New: Go figure, this button starts a new item. :) It will create a new item immediately after (in the list view, until the item is sorted after you're finished creating it) the item last edited/selected. If no item is already selected, then the new item will be created at the very end of your list view. The Entry Order for the item will always place it at the end of your list if you sort by entry order, until the next new item is made. :)
- Details: This button brings you to the Details screen for the item you last tapped on. If no item is currently selected, HandyShopper will tell you to select an item by tapping on it, and try again.
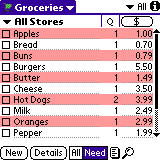
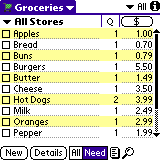
- All: The view of the two status filtering buttons. When All is highlighted (white text on black/blue), then all items in the list will be shown regardless of status, but withing the confines of the selected store and/or category. This is the view you usually start in when composing your shopping list for use at the store. (Figure 2.33)
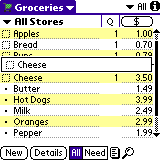
- Need: The second status filtering button, this one shows only items marked as Needed in the list view when highlighted. As before, depending on store and category filters, any item marked as needed will appear in the list, with all other items being invisible to you. This is the view you use when you're AT the store, to check off items as you place them in your cart. (Figure 2.33.5)
- Not Needed: This isn't a button of it's own, but instead is the view you get when neither All or Need are highlighted. To get this view, simply tap the currently highlighter All/Need button to UN-highlight it. When both buttons are black text on a white background, you're in the Not Needed status view. Any item not marked as needed will be shown. This includes items that have never been marked as needed, as well as those that have been checked off. The only items not shown are those that are still needed.
- Actions Popup Menu: This little icon gives you access to several commonly used items. Refer to the section on the Actions Popup above for more information.
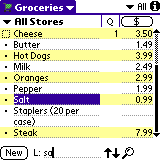
Figure 2.35- Lookup tool: Tapping this small magnifying glass icon will replace the Details, All/Need buttons, and the Actions Popup icon with a text entry area along with a couple arrows. Entering text into this area will tell HandyShopper to skip to the first item in the current sort order that has a description starting with the characters you enter. In the example (Figure 2.35), the letters "toi" have been entered, and the list has skipped to the first item in the list beginning with those three letters. Tapping the arrow pointing down would bring me to the next entry beginning with those three letters, and tapping the up arrow brings me to the previous such entry. Making this process even faster and easier, there's no need to even tap the little magnifying glass icon. If there are no items selected, merely writing in the graffti area will begin the lookup process. If you were looking for a particular item, but did not find it in your list, tapping the New button will begin a new item, with the letters you've already entered into Lookup as the beginning of the new item's description. HandyShopper even capitalizes the word for you! :)
- Blank Space?: There would appear to be some empty space next to the magnifying glass icon. Actually, this is the shift mode indicator. If you write a shift stroke, you'll see the little up arrow appear. All graffiti modes are indicated in this space. If there are no modes in effect (shift, shift lock, punctuation, extended shift, etc), then this area will be blank.
Figure 2.36
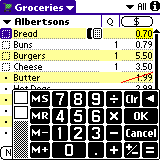
Figure 2.37- Calculator: When tapping on a field for which the calculator is useful (Price and Quantity), a simple calculator will appear on the screen. You can use this calculator to tap in the number you want instead of having to use graffiti. The calculator provides simple math functions as well as simple memory functions. The memory functions make it easy to copy and save numbers between items and use them in calculations. It can remember only one number at a time, I think. To be honest, I'm not entirely sure how the memory function works, as I've never used memory functions on calculators before. If anyone wants to fill me in on this, I'll be happy to add a better explanation to this guide about it. anyway, to the far left of the price or quantity field, there is a small icon that looks like a square with dots in it. This is actually a little calculator icon, and tapping it toggles the calculator on and off. With the calculator toggled off, you can use graffiti to enter the numbers you need. The calculator setting is a global preference, so any list you use will have the calculator turned off or on, depending on what you last had it set to. Figure 2.37 shows what the price entry field looks like with the calculator turned off.
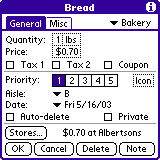
Item Details Screen
The Item Details screen is your all-in-one (well, two ;-) access panel to the data that each item in your list can store, with the singular exception of the Custom Text field. When you tap an item on your list, then tap the Details button, you'll see a screen as in Figure 2.38 showing you all the basic fields, and access to the others such as the Stores, Note, and Alarm Set screens for the item. Unfortunately, the only way to access the Custom Text field at this time is by showing that column in the list view. Making the Details screen more versatile is that you can scroll between items while viewing their details. Pressing the down or up button will show you the details of the next or previous item.
Figure 2.38
Figure 2.38.5
- Tabs: There are two details views, the General tab (Figure 2.38) and the Misc tab (figure 2.39).
-- On the General Tab... --- Quantity: Tap on the number next to the Quantity label and you'll be presented with a calculator to enter the quantity you wish. This calculator cannot be turned off, but you can still enter numbers with graffiti if you prefer. Tapping the OK button on the calculator, or writing the return stroke in graffiti will apply the number you've entered.
- Units: Tap the Units indicator (immediately to the right of the quantity) to change the units for the item. Choose from the global list of preset units (user editable), or enter a custom unit for the item.
- Price: This field allows you to edit the price associated with the item, depending on which store the list is sorted by, or if per-store prices are not enabled. If per-store prices and aisles are not enabled, then the price entered will be the "normal" price. If per-store prices and aisles IS enabled, then the price entered will be associated with the store currently being viewed in the List View. If All Stores or Unfiled is chosen for the store filter, then tapping the price field will bring up the Stores screen for the item, allowing you to edit price and aisle information for the item for each store (Figure 2.41).
- Tax: Mark whether the item should have tax applied to it or not. If Tax 2 is turned on, then there will be two checkboxes, one each for Tax 1 and Tax 2.
- Coupon: Mark if the item is a coupon or not. This flag is useful in that you can filter all items not marked as coupons out of the list view by turning on the "Only show items with coupons" feature in the View Preferences.
- Priority: A bar selector for the 5 priority levels. Tap the priority level you want to assign the item to and it will be highlighted, indicated that the priority is chosen.
- Icon: Assign an icon to the item. The icon choose will appear for you to select an icon from. Icons will appear at the far right of the item description in the list view, or in the icon column when it is turned on.
- Aisle: Similar to the price field, if per-store prices and aisles are not enabled, or if a particular store is being viewed in list view, the aisle chosen will be applied to that store. If per-store prices and aisles ARE enabled, AND the list view is showing All stores, or the Unfiled store, this will lead to the Stores screen (Figure 2.41) for editing.
- Date: Assigns a date to the item with choices of Today, Tomorrow, One week later, No Date, and Choose date... Choose date... leads to the standard PalmOS date picker.
- Auto-delete: Mark the item to be automatically deleted when the checkout command is run.
- Private: Mark the item as private. This will allow you to hide, mask, or show the item depending on your system security settings.
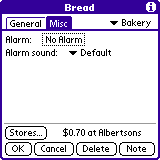
-- On the Misc Tab... --
Figure 2.39
Figure 2.40
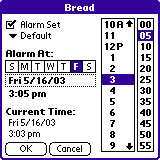
Figure 2.41- Alarm: This leads to the alarm setting screen (Figure 2.39). On that screen is a checkbox to enable the alarm or not, and date and time pickers. When setting an alarm for an item that does not yet have one, an alarm date and time for no more than 5 minutes in the future is automatically set, and the Alarm Set box is checked. Pick a day of the week and a time of day with the weekday and time pickers. Tapping on the date with the dotted box around it will lead to a standard date picker. Keep in mind that if you pick a date more than a week in the future, be sure to pick the day you want. If you then tap any of the weekday buttons, the date will be set to the day within that week from the current date. The Current Time shows the date and time of the moment. Tapping OK will set the alarm, and tapping cancel will not. To remove an alarm on an item, simply view this screen and remove the check from the "Alarm Set" box and tap OK.
- Alarm Sound: Choose from the sounds available in your System MIDI Sounds database for an alarm sound. HandyShopper will play this specific sound when this specific alarm is triggered, so that you can have distinctive alarms.
-- On both tabs... --- Category: Almost exactly like the category chooser in List View, pick from the categories you've programmed for this list, Unfiled, and a link to the Category editor.
- Stores: The Stores screen (Figure 2.40) lets you edit the store assignments (which stores an item will appear in the list for), aisle, and price information for each store. Assigning price and/or aisle information to a store for the item will also assign the item to that store, but you can unassign the item from the store if you wish it to not appear in that store's list for some reason. When per-store prices and aisles are not enabled, the Stores screen simply allows store assignments. The aisle and price columns are not present.
- OK/Cancel: Tap OK to save all changes, or cancel to not save changes.
- Delete: Tap this to delete the item. There is a confirmation message in case you tap this button my accident.
- Note: The note screen (Figure 2.41) is where the note for an item is edited and viewed. This screen also allows you to delete the note with a Delete button (with a confirmation, of course ;), and has a font selector for notes. The font you select is the font used for all notes throughout all HandyShopper lists. This should probably be a list-specific setting, or even an item specific setting, and it might be so for a future version of HandyShopper. Notes can be up to 4k in length, just like other notes in PalmOS applications (like Memopad and To Do).
Database Management Screen
The Database management screen (Figure 2.42) has the following functions for each list available via the popup list. Tap the small triangle to the far right of the list name to access these options:
- Rename...: This feature will provide a small pop up screen that allows you to change the name of the currently open list. Remember, to change the name of any list on your device, you need to open the list first, then choose this function. Database names can be up to 27 characters long, including spaces and other characters. This is the only way a database should be renamed.
- Delete...: This will open a screen very similar to the Open Database screen, with a scrollable listing of all the HandyShopper databases on your device. Delete a list by highlighting the one you wish to delete, tapping the Delete button, then confirming the deletion by tapping the OK button when the confirmation message appears.
- Beam: Also similar to the Open Database and Delete Database screens, this one allows you to choose a database to "beam" (send to another Palm OS device using the infrared port). Just choose the list you want to beam and tap the Beam button.
- Move to card/handheld: On VFS enabled devices (most Palm Powered devices with a memory expansion card slot), this option will move the file to the memory card. HandyShopper stores it's lists in a specific driectory on the card: /Palm/Programs/HandyShopper/. If the list is already on the card, this command will show "Move to handheld" which means that the list will be moved from the card to the device's RAM. Having the list on the card can save precious RAM, but lists on a card cannot make use of alarms, the global Palm OS Find function, or the Copy Item to..." function in HandyShopper. Opening lists from the card can also be relatively slow due to the time needed to copy the list into RAM for viewing and editing, as well as the time needed to copy it back to the card when you're done, so decide the best location for your lists.
- New...: This button at the bottom opens the New Database screen so that you can create a new list.
- Back: This button at the bottom returns you to the previously open list.
Figure 2.42