HandyShopper User's Guide: Getting Started

Sometimes a new user can be overwhelmed by all the features in HandyShopper, even to the point of deleting the application before experiencing its benefits. To help you get your feet firmly planted in the usage of this great application is this Getting Started section of the User's Guide. Read this section for the basics of starting a new list, setting it up, and using it. This section is based on setting up a grocery shopping list, but most of the information can be applied to other list types. Starting small and working up to more abstract uses of HandyShopper is always a good idea! :)


Context Sensitive Help
Create the New Database
Create Stores within the Database
Create Categories
HandyShopper Method of Use
Add Items to the Database
Review Items in the Database
Select Items You Need to Buy
Begin Shopping
Assign Aisles to Items
Calculate the Total Cost of Your Purchases
Checkout

Context Sensitive Help

The fastest and most convenient way to get help when using HandyShopper is to look for the little "i" in a circle. This is the universal symbol/button for "more information" in the Palm OS. It's usually found in the top right corner of a screen or dialog on the screen (Figure 1.2 below). Tapping this little "i" will lead you to a page describing your options and what they do. If you're ever unsure about what to do in a situation, just tap the "i" and you'll soon know what to do. This HandyShopper User's Guide is much more in depth, but the Context Sensitive Help is great for a quick reminder, or help when none other is available.


Create the New Database

If you are using HandyShopper for the first time, the program will automatically prompt you to create a new database on startup. (Figure 1.1) Tap the "New..." button to create a new database, for which you have several options.
  1. First, give your new list a unique name, such as "John's Shopping List." A unique name is preferred because a generically named shopping list may be overwritten by a shopping list that you download from the internet, or receive from someone else via infrared beaming. Some people will use their initials after a "generic" name to give it a uniqueness, such as "Groceries JSD". (Figure 1.2)
  2. Next, select the database style you want. This selection merely tells HandyShopper to choose some pre-defined preference settings. For specifics on each of these database styles, refer to the Initial List Preferences section of this Guide. For now, choose a Shopping List style, leaving the per-store prices option unchecked.
  3. If you like, you can choose a different icon for your list. This icon appears in the list of databases, as well as next to the list name in the title bar of HandyShopper when the list is open. With the default icon set installed, the default icon for Shopping lists is a grocery cart icon. To change the icon, simply tap the icon displayed to access the icon chooser.
  4. Tap the "OK" button to continue, which leads you to the DB tab of the Preferences screen. You can always return to tweak preferences later, so for now, tap the "OK" button on the screen to finish the inital list creation.
For more information on the Preferences and other screens in HandyShopper, please refer to the Preferences and Menus sections of this guide. For now, let's move on to actually building your list!

Figure 1.1


Figure 1.2


Create Stores within the Database

After the initial creation of your list, you'll be presented with an empty list screen. (Figure 1.3) This is the main list screen from which most list interation will be done, but until you get some items in there, it's not much use. But before we start filling it up with stuff, let's lay some more groundwork. Let's create stores.
  1. Tap on the store name area in the upper left of the screen. The default is "All Stores" so that's what you'll be tapping at first.
  2. From the short list that pops up, tap on "Edit Stores..."
  3. In the Edit Stores screen, tap the "New" button to create a new store.
  4. Enter a name for your store. (Figure 1.4)
  5. Tap the "OK" button to create the store.
For the purpose of this section, only create 1 store for now. Select the store name that you just added, and tap the "OK" button to exit the Edit Stores screen. You can, and probably should, go back later to create more stores by repeating this process.
NOTE: If you would like to organize your stores in a manner other than the default alphabetical method, you can insert a number before each of the stores' names (ie: "1 Supermarket", "2 Acme Market", etc.)

Figure 1.3


Figure 1.4


Create Categories

Adding Categories is as important, and as simple, as adding Stores to your database. Just follow these simple instructions.
  1. Tap on the category selector in the top right corner of the screen, which is set to "All" by default.
  2. Choose "Edit Categories..." to enter the Edit Categories screen. (Figure 1.5)
  3. Tap the "New" button to create a new category
  4. Enter your category name (Figure 1.6)
  5. Tap the "OK" button to create the category
  6. Repeat until you've created all the categories you need. There is a limit, though. Only 15 user created categories may exist, and each category may only be 15 character long, including spaces.
    NOTE: If you would like to organize your categories in a manner other than the default alphabetical method, you can insert a number before each of the categories' names (ie: "1 Produce", "2 Baking", etc.)
  7. Tap the "OK" button at the bottom of the Edit Categories screen to exit the category editor and return to the main list screen.
Back in the main list screen, choose a category to enter new items under by tapping the category selector and then tapping the category to switch to

Figure 1.5


Figure 1.6


HandyShopper Method of Use

The basic shopping process using HandyShopper is:
  1. Add items to the database as Not Needed ()
  2. At home, mark items () that you need to buy in the "All" view ()
  3. At each store, have the list sorted by aisle in the "Need" view () showing only the items you need to buy ()
  4. As you place items in your shopping basket, check them off ()
  5. When you are ready to checkout, reset the items that you purchased back to Not Needed ()
  6. Continue shopping at the next store for remaining Needed () items.
Each of these steps will be explained in detail in the following sections.

Add Items to the Database

Here comes the time consuming part... adding items to the list. Some people choose to create a complete list of all the items they ever purchase at once, and some people build their list week by week, trip by trip, as the items are needed, building their list over time. Both ways have advantages and disadvantages, but they both work just as well in the long run. To add new items to your list, follow these simple instructions.
  1. If you're adding items that you don't yet need, it's best to add them in All view. Tap the "All" button at the bottom of the screen () to highlight it and switch to the All view mode.
  2. Tap the "New" button at the bottom of the screen to begin the creation of a new item. (Figure 1.7) The new item will inherit the currently chosen category and store. If "All Stores" or "All categories" is chosen, the item will fall into the respective "Unfiled" list (as well as the "All..." list). Adding items that fall into the same category at once with that category selected is an easy way to ensure items are found in their appropriate categories later on. Otherwise, you may find yourself going through your entire list while checking and fixing the category for every item.
  3. Notice the single-dot "Not Needed" marker () next to the item. All items created in the All view will start with this status.
  4. Repeat the above steps for all items that you plan to add to your shopping list, whether you currently need them or not. (Figure 1.8)
By default, HandyShopper will sort the list alphabetically in ascending order by the item description. To add items to another category, simply tap on the category name and select the new category's name, then begin adding items under that category.

Figure 1.7


Figure 1.8


Review Items in the Database

After you think you've gotten all the items you need addded to you list, sometimes you need to double-check things, or even just look it over...
  1. To view all your items, you can switch to "All stores" and the "All" category. (Figure 1.9) You may also choose to view all items in a particular store by choosing that store.
  2. To move through the list, you can either use the hardware Page Up and Page Down buttons, or use the scroll bar on the side of the screen. The scroll bar functions similarly to most scroll bars. Tap the arrows at the top or bottom to scroll up or down one item at a time. Tap directly above or below the scroll bar "handle" to skip one page up or down. Tap and drag the scroll bar handle to move quickly through the entire list.
  3. If you would like to jump to a specific item on the list, click on the magnifying glass then start writing the name of the item in the "L:______" section. (Figure 1.10) Also, without an item selected, you can simply begin writing the name of the item to accomplish the same task.

Figure 1.9


Figure 1.10


Select Items You Need to Buy

Before you actually GO shopping, you need to tell HandyShopper which items you plan to buy. Follow these instructions to select items you need to buy.
  1. While in the "All" view (), select the items that you will need to purchase, by changing the Not Needed status () to a Needed status () with a quick tap on the status icon. Tapping the status icon for an item repeatedly will toggle between the Needed and Not Needed status icons.
  2. When an item is changed to Needed status, HandyShopper automatically sets the quantity ("Q") to the amount normally needed (the default for this value is "1").
  3. By default, HandyShopper will sort needed items to the top of the list.

Figure 1.11


Begin Shopping

Your list is ready, and you want to go shopping to get everything you need, now what?
  1. Switch to the "Need" view (). You'll notice that all the Not Needed items "disappear" from view, and all the Needed icons from the All view () change to similar Needed status icon for the Need view () (Figure 1.12)
  2. Begin shopping for the items you need. If you plan to shop at multiple stores, be sure you've chosen the store you are currently at so that items that are only at other stores do not clutter your list.
  3. As you grab an item and place it in your shopping cart, write in the item price and check off the box next to the item () by tapping the status icon once. The item will then have a line drawn through it, and move to the end of the list. (Figure 1.13) If you have a list longer than one page, the item will seem to disappear, but it is just on the last page.

Figure 1.12


Figure 1.13


Assign Aisles to Items

One of the great features of HandyShopper is that you can assign aisles to items (even to specific stores) and have the program sort the shopping list to the order you would normally shop for items in the store. Follow these instructions to learn how to sort your list by the aisle data.
  1. Tap the Menu silk-screen button, and select "Misc" menu, then the "Preferences..." option. (Figure 1.14)
  2. Tap the Sort tab to view the Sort Preferences. (Figure 1.15)
  3. To change the primary sort field from Description to Aisle, tap the first popup list under "Sort by:" and choose "Aisle" from the list. With the "A over Z" icon appearing to the right of the selection, the list will sort in alphabetical order. Tap that icon to reverse the sort order.
  4. Tap the "OK" button at the bottom of the screen to save the Preference changes and return to the List view.
  5. HandyShopper will automatically sort your list by Aisle. Note that if you're tracking per-store prices and aisles, the list will have to re-sort the list every time you change stores, since the aisles will be different.

To easily assign aisles to items in the shopping list while making your list or on a shopping trip, you can turn on the Aisle column and set the aisle for each item as you go.

  1. Tap the Menu silk-screen button, and select "Misc" menu, then the "Preferences..." option.
  2. Tap the Columns tab to view the Column Preferences. (Figure 1.16)
  3. Tap the check box next to "Aisle" to turn on that column.
  4. Tap the "OK" button at the bottom of the screen to save the Preference changes and return to the List view.
  5. The Aisle heading ("A") will now be present on the shopping list.
  6. Tap the area under that heading next to each item to access a popup list of aisles to choose from. You can either manually scroll through the list and select the aisle number you wish, or you can write the aisle number and select it or write an "Enter" character. (Figure 1.17)
  7. Tap on the aisle of your choice in the list to assign that aisle to the item
  8. With per-store prices and aisles enabled, you can assign an aisle to an item for each store in your database. If you're viewing a single store, then the aisle you choose for the item will be for that store. If you're in All Stores view, HandyShopper will instead popup a screen listing all the stores for you to choose which store you want to set the aisle for.
You do not need to have the Aisle column (or any other column) visible to sort by it.

Figure 1.14


Figure 1.15


Figure 1.16


Figure 1.17

An Example of Aisle Numbering Method

This is an example of an alternate method of assigning aisles to items that has worked well for some users at some stores. Let it serve as an example of creative use of the abilities of HandyShopper. If this method works for you, then great! But feel free to tweak it or use some ideas from this method in your own method.
  1. First, consider all store aisles on HandyShopper as "tens" -- Aisle 1 in the store are aisles 10-19 on HandyShopper, Aisle 2 in the store are aisles 20-29 on HandyShopper, etc.
  2. Second, begin numbering the sections within a store aisle in an orderly manner. The first "end-cap" is given a "0" aisle extension (10, 20, etc.)
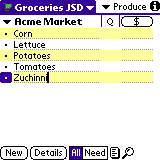
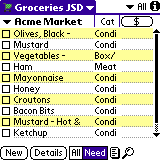
  3. As you go down the aisle, assign the first section on the left as a "1" aisle extension (11, 21, etc.), the section opposite it is given a "2" aisle extension (12, 22, etc.) (Figure 1.18)
  4. Reserve the "0-9" aisles for items that are "first in" items — bread, produce, sales items, bakery, etc. — depending upon each store's layout. Also, reserve the "A-Z" aisles for "last out" items — deli, bakery, film, video rentals, floral, etc. — as well as any items you specifically *want* to pick up last (frozen foods, deli baked items, etc.)
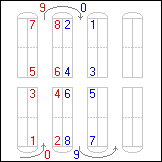
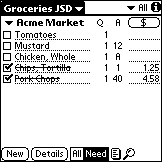
Figure 1.18


Calculate the Total Cost of Your Purchases

At any time during your shopping you can estimate the total cost of the items in your grocery cart, by clicking on the "Estimate Cost" button (). The "Total:" section of the screen will give you the estimated total cost of the items in your shopping list — including items that you have not yet placed in the grocery cart. (Figure 1.19)

The "Purchased:" section only shows the total amount for items that you have checked off (). Tapping the "Purchased" button will toggle to "Needed" to view the total cost information for all the items you still need.

You can also change the setting to display only items within a particular Category or Priority using the popup lists at the bottom of the screen.

Figure 1.19

Checkout

The Checkout function is an important one for shopping lists that are used regularly. It resets purchased items back to their Not Needed status, as well as deletes items marked for automatic deletion. Read below to learn how to use the Checkout feature. There are two different ways to perform a "Checkout".
  1. The first method is to tap the Menu silk-screen button, select the "Record" menu, then tap "Checkout...". (Figure 1.20)
  2. HandyShopper will then perform the Checkout function (Figure 1.22)
  3. The second method is to tap the "Estimate Cost" button (), then tap on the "Checkout" button. (Figure 1.21)
  4. HandyShopper will then perform the Checkout function (Figure 1.22)
Checkout will reset all checked items () in the entire database back to a "Not Needed" status (). In the example in Figures 1.22 and 1.23, you are finished shopping for the items at "Acme Market" and are now ready to purchase the remaining items at another store.

Figure 1.20


Figure 1.21

Figure 1.22

Figure 1.23


©2001