It had been a while since I made much progress on this project. I was stumped as to how I was going to make a temporary connection between the chair and pedal/wheel assembly, such that it could be separated for transport between the garage and family room, and how I was going to get the wheel at the height and location I needed. I decided to look through commercial and home-made VRCs again via the links on the eRacer Garage page for some inspiration. After spending hours pouring over those links again, and a late-night breakthrough, I came up with the following ideas. Again, the driving force (hehe ;-) behind this project was just to get a good position for wheel gaming, and to spend as little money as possible. So, I used scrap and hardware I already had.
|
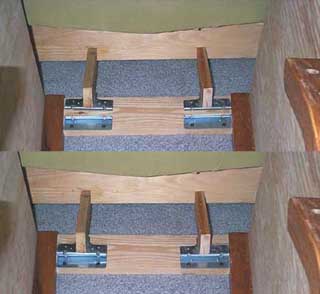
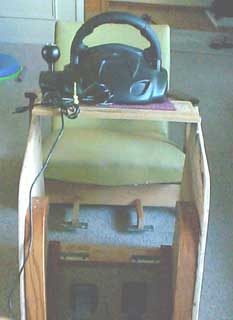
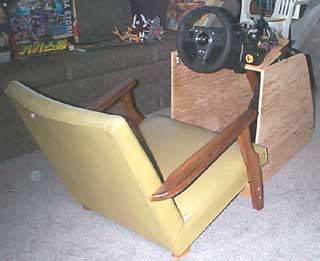
This is what I used for the connection between the chair and the pedal/wheel rig. The revelation for this came late one night when my mind was going over ideas for this. I remembered that I had a set of speakers that I used to hang on the walls with these heavy hook things. One side of the hook would be mounted on the wall, and the other side on the speaker. I had two pairs of these hook things, which would be perfect for the rig, because I could easily put them together and take them apart, but when together, they would prevent the seat and rig from separating when I pressed hard on the accelerator or brake. Putting one set on the pedal/wheel rig was easy enough, by just mounting them to a bar spanning the two sides of the old kneeling chair. Getting the other parts of the hooks to be on the chair, and the right height and distance from the pedal/wheel rig was very tricky, and my solution is VERY kludgy and is likely to break off at some point. Hopefully one of these days I'll have another revelation to improve that. |
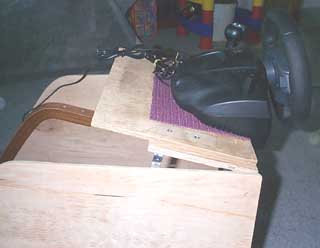
| I used angle braces to attach the wheel plate to the sides of plywood. This allowed me to first attach the plate near the front, and set an angle to the plate, then screw it in at all points. At first, the plate was tilted up too much, and driving was somewhat uncomfortable with the wheel in an almost totally vertical orientation. I adjusted the angle, and I think it will play much better now. | |
|
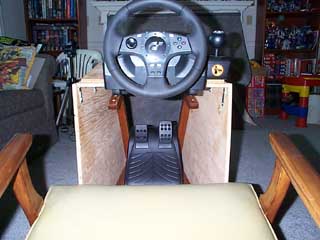
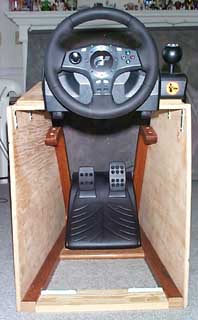
This is the view from the chair, showing approximately what you would see if you sat down in it. It's tricky to get into, though. First you set the pedal/wheel rig down, then the chair about 8 inches away from that. Sit carefully in the chair, put your legs into the pedal/wheel rig, then pull the rig up to the chair while leaning back slightly to raise the hooks on the chair out of the way of the hooks on the rig. Then, set the chair back down, and push the rig away from you again to engage the hooks. Since my method of putting the hooks on the chair is so poorly done, I have to reach down and kind of help the hooks to engage completely. It's not a quick and easy thing to do, but when I sit down in this thing, I always plan to race for a while. So I always drain the vein, get a drink and the cordless phone, set up the game I'm gonna play, and THEN get situated. ;-) |
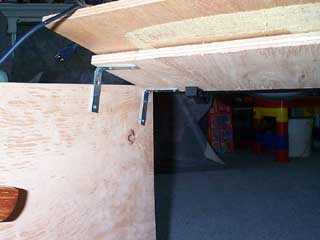
| This is looking from the base of the pedal/wheel rig up at the underside of the wheel plate. You can see all four angle braces, as well as the open area in front of the wheel plate. If you look closely, you can also see that the wheel plate has an extra piece. That's because the single wheel plate is too thin for the wheel to mount to without the clamp extenders. Problem is, with the clamp extenders, the clamps come too far down, and bother my knees a little. So, I took off the clamp extenders, and added another board to the wheel plate to thicken it. I also added a piece of non-slip shelf foam to make sure the wheel is securely mounted and won't slip while playing. | |
|
The side of the wheel plate shows the angle I have it set to. It's not adjustable, though if I find that this angle is bad, I can simply unscrew the angle braces, change the angle, then screw it back together. Hopefully I can find the perfect angle without turning the plywood sides into swiss cheese. ;-) Obviously, adjustable would be better, but I didn't have the hardware to do that. |
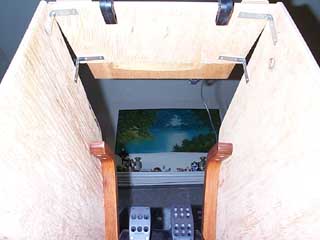
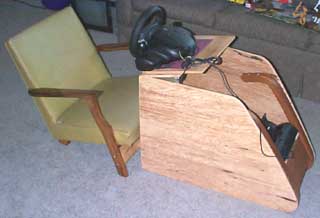
| Looking into the base without the chair in the way, you can easily see the pedal mounted, the bar across the base where the hooks are, and pretty much the entire assembly. Sucks, don't it? ;-) | |
|
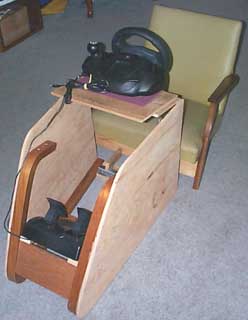
This is approximately the position I set the two pieces in before sitting down. After I sit, I lean back in the chair, pull the rig to me, set it back down, and engage the hooks. It sounds more complicated than it really is, of course. I'd rather it were just one piece I could hop into whenever I wanted to, but with a tight area in front of the TV, I can't even leave it in the same room all the time. Easy transport to the garage for storage is a must, and even the way it is, it's not all that easy. But hey, I saved $300 by not buying one of those commercial rigs that use steel tubes and whatnot. :) |
| These three photos show the rig in it's "set up" state. Yes, it's fugly. But, it's also super cheap. I had a chunk of plywood for the sides, I had some other scrap wood lying around, and various bits of hardware and nails and screws to put it all together. I shaped the sides by laying the old kneeling chair part on the plywood and tracing the shape. Then I cut the pieces out, sanded down the rough edges, and nailed them on. I'll screw them on later, but all the other parts are held together with screws. | |
|
|