~ Greg's Scalextric Digital Tips Page ~
If you're just starting with slot cars, please be sure to review my Slot Car Tips page. If you're also getting into Scalextric Sport Digital (SSD), please come back here when you're done there. The tips on this page apply specifically to Scalextric Sport track (which SSD uses) and SSD cars and digital track pieces.
- Intelligent layout design
- Magnetize the Lane Change Flippers
- Treat rails with INOX MX3
- Get an Advanced 6 car Power Base
- Enhance your hand controllers
- Calibrate the controllers
Intelligent layout design
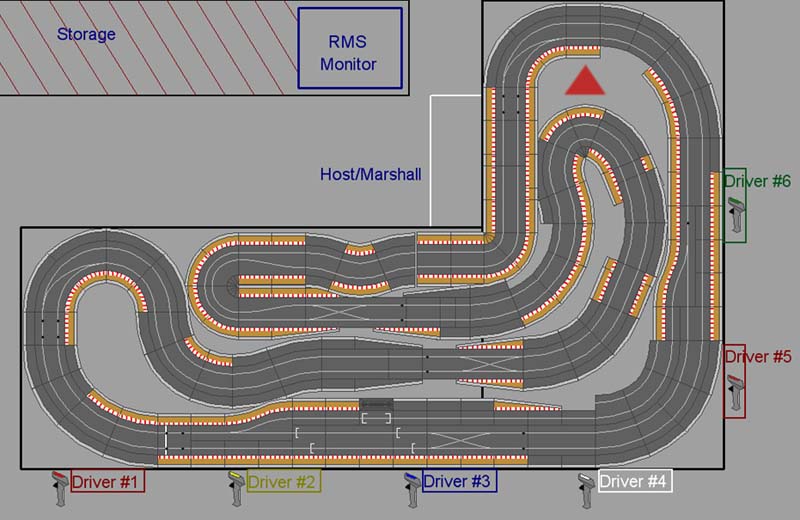
What is there to designing a layout for SSD? More than you might think. There is one rule of thumb that has served SSD users well. It is based not only on fun racing, but also how the technology works and what enables the highest degree of reliability. All sensor tracks (lane change sensors, lap counters, etc) should be at the end of a straight, just before a turn, and NOT LESS than one standard straight after a turn. It is important to understand why, though. Here are a few reasons.
- A car that is coming out of a corner fast, whether it has magnets or not, can often have it's tail out in a drift. If this happens while the car passes a sensor, then the LED under the car that tells the track what to do will not be seen by the sensor in the track, and therefore the command will be missed. This can mean missed or accidental lane changing, or worse, missed laps! Don't put sensor tracks at the beginning of a straight, or in the middle of a sequence of turns.
- A car that is accelerating or is moving at high speed can deslot on a lane changer. For example, in a long straightaway, as everyone enjoys when they can set one up, if a car were to try and change lanes in the middle when it was going full speed, the sudden shift to one side would be like hitting a tight turn too fast, and the car will come out of the slot and crash. Putting the lane changers at the end of a straight means that the car is already slowing down for the upcoming turn and taking the lane change will be no problem.
- An accelerating car, or one at high speed, will actually have the nose up a little, and the guide will be slightly up in the slot. The lap counting tracks, such as the Digital Lap Counter or the 6 Car Powerbase, use a guide blade sensor as part of the counting system. If the blade is not nice and deep in the slot, and it doesn't properly cut the sensor beam, the lap will be missed. If the sensor track is placed in a braking zone, such as at the end of a long straight, or right before a tight turn (or both!), then the car will be slowing down, driving the guide as deeply into the slot as it can go, ensuring a reliable count when crossing the blade sensor. Replacing guide blades with deeper ones can also help this issue, but that can be expensive and time consuming. It's better to design your layout with this in consideration to avoid problems from the start.
- Finally, it makes good racing. The vast majority of overtaking/passing maneuvers in racing take place in the corners, where one driver takes a risk and brakes a little later, or cuts the corner a little sharper, or even takes the outside lane at the risk of losing the edge. Putting your lane changers in these prime overtaking locations makes for more realistic racing.
Take a look at the plan for my SSD layout. The only lane changer without proper straight track before it is the one on the far left. It's only there because I wanted to use that piece in my layout because I had it, and nowhere else to put it. Every other track has plenty of run up space before it. The powerbase sensor track is at the end of the main front starting straight and is where most cars will need to hit their brakes. There is one straight lane changer in the front straight, but this is where it is so that a car can change to the outside lane to avoid a potential collision with someone about to exit the pit lane. Is my layout perfect? Not by any means. It is a lot of fun, though, and overall very reliable and makes for a lot of great multi-car racing.
In the end, it's up to you. I highly recommend using a track planning application for your computer, such as TrackPower or UltimateRacer3 on Windows, or RailModeller for Mac. These programs let you experiment with track virtually, making it much easier to see what you can fit in a given space with the track pieces at your disposal. It also saves wear and tear on the track connectors. Note that while this tip applies to all Scalextric Digital slot cars, it's especially important for non-magnet car racing, where the cars are especially tail-happy, and rely on gravity alone to keep them on the track.
Magnetize the Lane Change Flippers
What? Yes, magnetize the lane change flippers. Simply put, by gluing a very small magnet into the cavity on the underside of a lane change flipper, we are enhancing the design that energizes the flipper (so that a car does not stop dead on it) when it touches the rail. Without a magnet, the flipper can bounce a little off the rail, or just not remain in contact with it. When a car passes over a dead flipper, it loses power. At cruising speed, this isn't a problem, but if someone slows down too much or stops on a flipper that has no power, the car will not be able to drive away.
Doing this mod will void the warranty on your lane changer, so keep that in mind. If you're ok with that, then search for some 5mm by 1mm Neodymium magnets. Ebay is a good place to look. I used discs, but you can probably use square ones just fine. Don't get bigger than 5mm, or it won't fit and you'll need to do some more modifications, and don't get thicker than 1.5mm. 1mm works very well. When your magnets arrive, get a screwdriver, an X-acto knife, some super glue, and your lane changers. This works well on all curved lane changer, and the pit entrance pieces. This doesn't work well on straight lane changers because the cavity where the magnet would go is too far back and doesn't get close enough to the rail to have any useful effect.
The procedure itself is fairly simple. Open up the panel on the bottom of the lane changer and set the screws and panel aside. Use your craft knife to cut away some of the plastic under the flipper, nearest the tip. Keep cutting, being very careful not to cut the electronics, until you uncover the cavity in the flipper itself. Check out this picture to see what I mean.

That picture also shows the magnet in place. This magnet is actually a 6x1mm magnet, so it sticks out a little bit. A 5x1mm magnet won't stick out much at all. Put one magnet right at the point of the cavity, and glue it in place with your super-glue. Just a drop is enough. Now, you might be tempted, like I was, to put extra magnets into the inside of the rails as well, to provide even stronger magnetic connections. Don't do it! Even if they work at first, the solenoids will eventually get tired and start to fail. Stop at one magnet in each flipper, and you'll be fine. Again, do this on all curved lane changers and pit lane entrances. Don't bother with the fixed exit flippers for those tracks, and don't bother with straight lane changers. For those it's either not necessary, or won't work.When you're done, make sure the solenoids are still hooked up to that black plastic thing that goes into the flipper. It's really common for that to come out accidentally. If it did, you'll need a small magnetized screwdriver, or a pair of tweezers (or two!) to carefully align the pins in the solenoid with the holes in either end of the black plastic thing. Once you get those pins back in and the black thing seated properly in the flipper, replace the cover and screw it back together. Now, put your lane changer in a track and enjoy your powered flippers!
Treat rails with INOX MX3
What in the world is INOX? It's a brand of lubricant. They have many formulas, but the one many of us have found useful is their MX3 lubricant. Wait... a lubricant as a rail treatment? Yep! Well, it's not just a lubricant. It's also a cleaner and protectant. It also appears to be magical. :) But seriously, many users, including myself, have found that track treated with INOX MX3 is remarkably better than untreated track, even when that untreated track is spotlessly clean.
What it comes down to it, slot racing is really simple. You put an electrical charge to the track rails, which the car picks up and uses to power a motor. If any part of that loop is broken, the car stops. For digital, you not only need an unbroken loop, but also a really clean and reliable connection throughout the loop because there is DATA mixed in with that electricity. That's how SSD works. The rails have power with alternating current. Rather than just straight AC, though, the current is pulsed with control data for all 6 cars. Each car only pays attention to its own data, and does what it's told to do. If that data is not received reliably, then the car does not perform reliably. Dirty track can cause a LOT of problems, and dirt can come in many forms, not the least of which being oxidization, otherwise known as rust. INOX cleans buildup off the rails, and keeps it off.
The lubricating properties of INOX MX3 also help reduce friction between the car's braids and the rails. Anything that reduces friction (except between the tires and the track) is a good thing. Still, there seems to be more to it than just clean track and low friction. The power and data just moves much more reliably from the rails to the chip in the car when the rails have been cleaned and treated with INOX. It can seem a miraculous change, especially if you've been racing a while and have some cars that never seem to work right.
You can get INOX MX3 from a variety of sources, so definitely do some searching around. The inoxed.com and inoxlube.com sites both have retail locators to help you find a shop that sells it. I got mine from Amazon.com. Check out the "Upgrades" section of my Purchase Suggestions page for the link to that.
Once you have the INOX, how do you apply it? Easy! Just get some moleskin (adhesive backed cotton weave or felt) and a spare guide blade. Cut a strip of moleskin about the same width as a braid. Remove the braid from the guide blade, and stick on the moleskin in its place. Wrap a little around each end. Then, put some INOX on the moleskin and use the contraption to apply the inox to the track rails. The moleskin will get really dirty, but don't worry about it. You don't want the rails to be dripping with the stuff, but you should see that some INOX is on the rails. Do the whole track, adding more INOX to the moleskin as needed. When you're done applying it to the whole track, use a rag to wipe up all the extra, and the gunk that comes with it. If you get any INOX on the track surface, wipe it up as well as you can, maybe using a paper towel to get it all up. When you're done, try your cars again, and be amazed. :)
Get an Advanced 6 car Power Base
So you've been having a ton of fun racing around with friends or family members, maybe even all 4 cars at once, maybe with a lap counter to set a number of laps and see who wins. Can it get any more fun than that? YES! If all you have is the 4 car powerbase that came with your set, even if you also have the lap counter, you're missing out on a lot of fun and really cool features. If you upgrade your set with the new Advanced Digital 6 Car Powerbase, you'll have access to all these great features:
- Up to 6 cars at once
- Yellow Flag mode when someone crashes
- 4 different race types
- Variable power levels
- Pace/drone cars
- Analog Mode (for racing non-digital/analog cars)
- Large easily readable display
- AND MORE!
The Advanced Digital 6 Car Powerbase really takes your racing to a whole new level. The Pace car feature is especially nice for those who race alone, or even with just one other person, by adding the challenge of extra traffic on the track to deal with in order to win. All the features in the Advanced base are great, and they add up to something that is greater than the sum of the parts. If you like your set now, you'll LOVE it with the new base in control!
If you recently received the Advanced Digital 6 Car Powerbase and need some help getting started and learning how to use all those great features, check out the instructional videos I've made. They're each geared to a specific use or function on the powerbase, so you can watch them all, or only the ones you need. They'll all be here when you need them, so feel free to come back to watch them later when you need them. Follow the link above to check them out.
Enhance your hand controllers
Let's face it, the set controllers aren't that great. Unfortunately, our options are fairly limited, and most of them are quite expensive. Fortunately, it doesn't take much work to make a stock SSD controller smoother and more pleasant to use, as well as easier to control for more precise driving. If you've got the money, then you can't do better than a Slot.it SCP-01d controller. It's a phenomenal controller at an actually pretty good price compared to other mid to high end controllers. Check out the Upgrades section on my Purchase Suggestions page for that controller. If you would rather save the money and make the best of what you have, then follow these tips. Before you can do these, you'll need to open up the controller. There are three screws and 2 cover pieces to remove. The cover pieces pop off if you pry carefully on one side with your fingernails.
- Reduce any friction in the motion of the trigger. This includes:
- pushing the black wire deeply into the "keepers" that run along the bottom of the trigger path
- filing and/or lubricating the post that the trigger pivots on (make sure lube is safe for plastic)
- cleaning and lubricating the sliding resistor with a little INOX MX3 (one drop is plenty!).
- Replace the spring. The stock spring is REALLY hard, so much that it can actually make your finger tired after only 10 minutes of racing. The stiff spring also makes it difficult to control the car at low speeds, making it much more of a on/off switch than a real controller. Get a set of standard Parma controller springs (NOT the Turbo kind) and put them in place of the springs in the controller. You might need to slightly stretch or pinch the loops at the ends to make them hook into the SSD post and hook for the spring. Make sure the controller returns well to the fully off position, even when you release it slowly. If not, move the back end of the spring to the post that's further back. The lighter spring action will give you more control and less fatigue.
- Reduce any friction in the motion of the trigger. This includes:
Calibrate the controllers
Calibrating the controller is a way to make sure all the controllers are equal. You can only do this with the Advanced 6 Car Powerbase or an old 6 car base upgraded with PB-Pro. Calibration also ensures that the controller values are being properly interpreted as full and off. Doing so makes for optimum car control and fair racing. The method used for calibration differs between powerbases.
- Advanced Digital 6 Car Powerbase (C7042)
- From pre-race mode press the Down arrow, then press the left or right arrow button until you get to the "Calib" option. Press the down arrow to enter this mode. Each controller must then be fully pressed and fully released three times. The screen will tell you what to do, and when the controller is calibrated it will beep loudly. Repeat for all controllers, and any time controllers are changed, replaced, or moved to a different controller port.
- PB-Pro upgraded original 6 Car powerbase (C7030)
- Press the left or right arrow buttons until the screen shows "SET CTRL". Press the top (menu) button and the screen will show "Control?" Now, fully press and release a controller trigger, then press the trigger fully and hold until you hear the powerbase beep. Repeat this for all controllers. This should only need to be done once in a while, but be sure to do it again if your controllers change what jack they're plugged into or if you use software to control the powerbase which can reset the settings.