IN-DEPTH guide on how to join Phoenix LTX taggers into an LTTO hosted game
Hosting and joining LTTO games can be a tricky proposition to start with. When you put the new Phoenix LTX taggers into the mix, it gets even trickier. If you have not watched the two Training Videos below, please do so now, and then return to this guide on joining Phoenix LTX taggers into an LTTO hosted game. If you're not already a skilled LTTO host, then I STRONGLY recommend watching the LTTO Hosting Tutorial more than once, and practice with your own taggers with no distractions until you are confident that you can get any tagger to join any game. Once you are proficient at hosting LTTO games, you're ready to learn a mostly different way for players to join. YAY! :)
There are two ESSENTIAL things to remember when joining Phoenix LTX taggers into an LTTO hosted game. The first is to ONLY join Phoenix LTX taggers individually. The second is to always aim the Phoenix LTX at the host's dome during the joining process. These two crucial practices are necessary because the Phoenix LTX does not have a bi-directional transceiver dome like LTTO taggers do. Their dome can receive, but not transmit, so the actual firing emitter is used to transmit. That's why the player must aim at the host's dome while joining, and also why they must join individually. Only the host knows that it's joining, so other taggers can't automatically wait until that one is done. The players themselves must manage the timing.
Depending on your mix of players and tagger types, you might choose to have LTTO players join first to get them taken care of, or last so that you have lots of energy to help the Phoenix LTX players join. In either case, I strongly encourage you to have all your Phoenix LTX players line up in single file in order to take turns joining. Practice this process so that you can lead each player through the process without having to think about it, until they are comfortable with it. DEFINITELY follow along with your own gear while you read this! Go ahead and get an LTTO tagger for the host and a couple Phoenix LTX taggers to join. I'll wait.... Ready? OK. Note that this might seem like a long and complicated process, but it's not. I just wanted to be as clear and thorough as possible to help people learn. Once you "get it" it goes pretty quickly and easily.
Complete the hosting process on your chosen LTTO Tagger, and have all Phoenix LTX players line up to join with their taggers OFF.
Tell the player in the front of the line to set their tagger to Solo mode if the host is to randomly choose the team for the player for a 2 or 3 teams game, or to their chosen team mode if teams are decided prior to joining. For no-teams games, the switch position does not matter as long as the tagger is on.
Have the player aim their tagger directly at the host's dome. In some cases it may be easier to simply grab the barrel of their tagger and hold it to the front of your (host) tagger such that the primary emitter barrel has direct line of sight with the dome on your (host) tagger. It can also help to remove the Shot Blast accessory during the joining and debriefing process.
Both the host and player should listen carefully to the Phoenix LTX for the signal to proceed:
If you are using Solo mode in a teams game, the Phoenix LTX will announce, "Any team." to indicate that it is ready to join a randomly chosen team. The Strength and Ammo LEDs will stop doing the full scan, and will change to show a blank Strength meter, and a quickly scanning Ammo meter. Proceed to the next numbered step.
If you have selected a team in a teams game, the Phoenix LTX will announce the team number a second time to indicate that it is ready to join the selected team. The Strength and Ammo LEDs will stop doing the full scan, and change to show one, two, or three LEDs on the Strength meter to indicate team one, two, or three. The Ammo meter continues to do a smaller scanning animation. You are ready to proceed to the next numbered step.
If you do not hear the announcement, just check the LEDs to see if they are still scanning back and forth across BOTH the Strength and Ammo meters. If they've stopped scanning and display new information as in sub-steps a and b, that means the Phoenix LTX is ready to join and you can proceed to the next numbered step.
If you are playing a non-teams game, the Phoenix LTX will join automatically, and you will hear the familiar "ka-chung!" noise come from the host and then the player to indicate a successful joining. Skip to step 6.
Once the Phoenix LTX has indicated that it is ready to join the game, pull the trigger on the Phoenix LTX once. This tells the Phoenix LTX to join, and so the process begins. As the communication takes place, BOTH the host's tagger and the player's Phoenix LTX will make the "ka-chung!" noise to indicate successful communication.
DO NOT BREAK LINE OF SITE CONTACT BETWEEN THE PLAYER'S BARREL AND THE HOST'S DOME UNTIL YOU HEAR BOTH TAGGERS MAKE THE "ka-chung!" NOISE!
Once joined, the Phoenix LTX will announce the final team mode assigned to it and show Team and/or Player indicators in the Strength and Ammo meters as follows:
For no-teams games, the Phoenix LTX will announce, "Solo." See Step 8 for Player ID readouts.
For teams games on team 1, the Phoenix LTX will announce, "Team one." See Step 8 for Team and Player ID readouts.
For teams games on team 2, the Phoenix LTX will announce, "Team two." See Step 8 for Team and Player ID readouts.
For teams games on team 3, the Phoenix LTX will announce, "Team three." See Step 8 for Team and Player ID readouts.
For teams games, the Strength meter will show one, two, or three LEDs for teams one, two, or three. The Ammo meter indicates the player's ID on that team using solid and/or flashing LEDs where a flashing LED equals one, and a solid LED equals two. For example, 3 solid and 1 blinking LEDs means the player ID for that tagger is 7 on their team. For solo/non-teams games, one LED on the Strength meter means to add 10 to those shown on the Ammo meter, and two LEDs on the Strength meter means to add 20 to those shown on the Ammo meter. For example, two LEDs on the Strength meter and 2 solid LEDs on the Ammo meter indicate that the tagger has player ID 24.
Once the player's Phoenix LTX is successfully joined, and they are aware of their team and/or player ID, tell them to wait to the side while the rest of the players join. They WILL need to be near the host tagger to get the countdown to start the game!
Repeat steps 2-9 with each player until all Phoenix LTX taggers are joined in.
If you have LTTO players who have not joined in yet, have them do so at this time.
Once all players are joined into the game, make sure everyone gathers around the host to get the countdown for the start of the game.
Make sure all players know to get the countdown before they run off. If they leave without a countdown and don't notice it, they will be automatically kicked from the game. LTTO Taggers will show a countdown on the LCD screen. Phoenix LTX players will show Team ID on the Strength Meter, but a new solid/blinking LED animation on the Ammo meter as the countdown progresses. All taggers with a countdown will make the countdown beeping noises.
Press 2ndF and OK on the host tagger to start the countdown immediately, or wait for the 60 second timer from the last player joined for the countdown to start. Note that if you have a full game (16 players for 2 teams, or 24 players for 3 teams or non-teams games), the countdown will start immediately after the last player is successfully joined.
Have fun!
At the end of the game, you'll want to get everyone's score. Make sure all players surround the host with line of site between their tagger and the host's dome. LTTO players can simply hold their taggers level with the host tagger. Phoenix LTX players must AIM at the host's dome, but they can all do so at the same time. The host tagger will communicate with them individually so there is no worry of interference.
If there is a player that the host is unable to communicate with for some reason, note the team and/or player ID number try to find that player to get the host and player taggers closer to eliminate ambient interference or low battery issues. Phoenix LTX taggers will display their Team and Player ID during the debreifing process as specified in step 8 in case anyone doesn't remember their ID. Unfortunately, LTTO players do not have this luxury, and should try to remember their ID.
Sometimes a player will have an incident that results in a tagger being shut down or reset. In these cases, the player's game data is lost, and the host will not be able to get it. Make sure all players that are still active in the game have been debriefed, and then cancel out any players that the host is still trying to debrief.
When debriefing is complete, LTTO taggers will automatically display their PRNK (Personal Rank) on their LCD screen. LTTO players can also scroll up/down or press their display button to access other game data. Phoenix LTX players will need to view their Personal and or Team Ranks differently as follows:
Pull and HOLD the main trigger to read Personal Rank. LEDs light up in a way similar to Player ID in a non-teams game. LEDs on the Strength meter add 10 or 20 to the LEDs on the Ammo meter where a solid LED equals 2 and a blinking LED equals 1. Add them up to figure the rank.
Press and HOLD the shield trigger to read the Team Rank. LEDs light up on the Ammo side to indicate Team Rank. A blinking LED is Team Rank 1, a solid LED is Team Rank 2, and a solid AND a blinking LED is Team Rank 3.
Once everyone is finished viewing their ranks and other game data (on LTTO taggers), the taggers can all be turned off until the next game.
Training Videos
I'm working on a set of training videos for LTTO users. This list will include a complete hosting tutorial as well as individual tagger tutorials. For now, it has my first training video. These videos are shown using the YouTube service. If you have a YouTube account, feel free to add a comment, give the video a rating, or make it a favorite and stuff.
Learn everything there is to know about the new Lazer Tag gear from Hasbro.
Tips and Tricks
Here are some tips that I've discovered or been told about for using your LTTO equipment. As new products are released, new tips will emerge.
Use good batteries
Using cheap, low quality batteries, or batteries that are not fresh is the surest way to have a bad time. Poor quality or low charge batteries result in short range and poor hit detection. Use new, brand name batteries for best results. Lazer Tag endorses Energizer Max batteries, but Duracell and other good quality batteries are fine. Steer away from the cheap ones. Some store brands are ok, but if you're not sure of the quality, do some range testing against some name brand batteries before having many games with the cheap ones. If you have a stockpile of batteries, be sure to check their expiration dates and/or voltages using a battery checker, to ensure optimum performance. Note that the TMB does not have this requirement. Voltage regulators in the TMB allow it to use any decent battery until it's almost completely expired. Use the TMB to eek out the last several games worth of energy in batteries you've pulled from the pistols for losing range. :)
Leave the speaker on
While turning off the speaker or muting the sound on your tagger might increase overall battery life a little, or make it harder for your opponents to spot you in hiding, the battery life of LTTO taggers is exceptional, and the sounds are much too valuable to not have. There is a sound for almost every action and status indicator in the gear. With practice, you'll know everything there is to know about your situation merely by the sounds your tagger makes. Learn them, and use that knowledge to your advantage.
Use the HUD if you can
The HUD includes a speaker mounted near the ear for the sound effects. With the HUD plugged in and in place, you can turn the speaker on the tagger off, and still hear all the sound effects to help you play better. Also, with the tagger speaker off, only YOU can hear the sounds it makes, such as out of ammo, shields, or overload. This helps prevent nearby opponents from knowing your status by the sounds your tagger makes. The HUD also has status LEDs that can help you by keeping you informed. Learn to recognize the LED indicators and the sound effects that go with them. With practice, you'll almost never need to even look at the LCD on your tagger. Unfortunately, the HUD is not comfortable for a lot of players. As a result, there are mods that involve improving the comfort of the HUD, or even relocating its functions.
Learn how to aim
Aiming the LTTO Deluxe tagger can be tricky because the sights are on the left side rather than the top. Practice getting the sights lined up on your target while holding the tagger in its proper, vertical orientation. If you hold the tagger sideways, or "gangsta" style, other players may not be able to see your sensor, and claim that you are cheating by blocking the sensor. Then practice keeping them lined up while the target moves, and while you move. Then practice bringing up the tagger and getting the sight lined up quickly. The LTTO taggers are fairly accurate for "toy" laser tag guns, and so properly aiming it is very important for long range tags. You can also practice shooting from the hip if you like, but landing tags is usually more important than looking cool. ;-) The IRT-2X and Tag Master Blaster taggers have "iron" sights on the top of the tagger, with the notch above the screen, and the post on the transceiver dome. Simply line up the post in the notch and put that on your target for an accurate shot.
Add a scope
Since LTTO has such long range for a toy, people don't realize that you really DO need to aim them, or how far away you can land a tag if your aim is true. If you can snag an LTTO 2-Pack Accessory Kit somewhere, even as part of another set of LTTO gear, GET IT! The Thunder Pack provides excellent feedback, and the Scope really does help improve your aim. Note that for perfect aim with the LTTO "Virtual Scope" you need to put batteries in and turn the green dot on. Center the green dot on the crosshairs in the scope, then put that on your target. You'll be landing tags over 250 feet away with ease. Also, if you've got a scope from some other kind of toy or something, see if it will fit on your LTTO tagger, maybe with a scope ring or some other simple modification. You might be surprised to see what some players have managed to put on their taggers. ;-)
Learn the interface
The LTTO interface is considerably more complicated than previous Lazer Tag and other laser sport products. Take the time to sit down and learn what all the indicators mean, what information is available to you before, during, and after a game, and how to navigate the screens and read the information. If you have no idea what you're looking at or how to get some information, you'll be slowing down the hosting/joining and debriefing process for the rest of the players, not to mention putting yourself in danger of tags if you spend too much time trying to see how many tags you have left or how much longer the game will last if you don't know how to check for that information quickly.
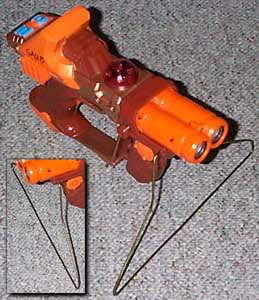
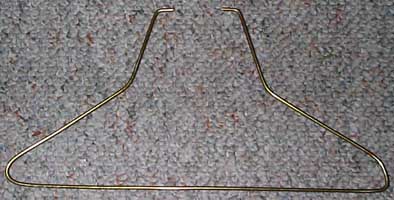
To play games where there is any kind of Zone, such as the Own the Zone and 2/3 Teams Own the Zone games, it's helpful to have a way to set the Zone Tagger down such that it will remain level and not fall over. Some people have found that propping one against a wall, or in the branches of a small tree, or even certain camera tripods screwed into the Thunder Pack mount will work. If you find those unavailable or unreliable, here's a quick and easy, and most importantly, cheap way to keep your Deluxe Tagger in a good position to serve as a Zone. All you need is a wire hanger, a pair of heavy wire snips, and some pliers. I don't have any measurements for you, 'cus I just kind of fiddled with it until it worked well enough. The main trick is to only make it "pinch" hard enough to remain in place. If you have the hanger pinch too hard on the tagger, it will want to twist and fall over as the hanger attempts to close together. Anyway, a few strategic bends of the hanger, and it's ready. Just put the ends of the hanger into the little notches on each side of the tagger's barrel, and it will stay. Pretty nifty, eh? :)
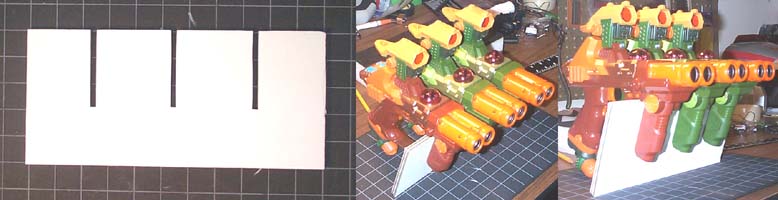
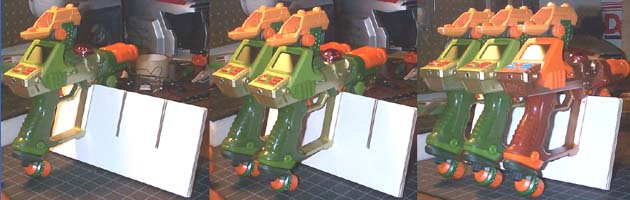
Here's another version. I did this just to test, and plan to make a longer one with more slots out of wood. Basically, it's a stand for multiple Deluxe taggers to be held in a space efficient manner, such as during games when people aren't actually playing, or at an arena that uses the taggers. Anyway, just an idea I thought of.
Basically, I just took some cardboard and cut slots in it at appropriate locations. The grid on the first image is a 1" grid, which tells you all you need to know. Note that the stand is for Deluxes with the accessory pack. Without the Thunder Pack, the stand wouldn't be as tall, maybe take an inch off the bottom.
My next one will be all wood, and permanently mounted at the correct angle, so that when it's completely empty, it's still ready to have taggers put into it. The only problem is that this technique doesn't work at all for the IRT-2x/Drone model. :\
Get a holster for your IRT-2x
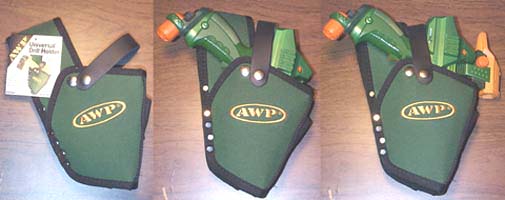
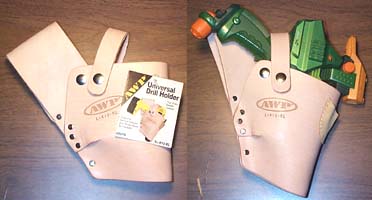
Sometimes you need to do other things with both hands, and you don't want to put your tagger on the ground where it can get stepped on or dirty. While the Deluxe design doesn't lend itself to a holster very well, the IRT-2x (Drone) does. One clever player discovered that cordless drill holsters were large enough for the Drone. You can get these from hardware stores that sell such things (Lowe's, Home Depot, etc.) and there are generally two kinds: the heavy nylon fabric kind, and the leather kind:
As you can see, the green nylon holster looks pretty good with the green Drone. It fits really quite well, also.
The leather holster isn't quite as flexible, but as it's leather, it will break in over time. One of the nice things about the leather kind (the light leather like in the picture, that is) is that it can be molded and formed to the shape of the tagger to fit better. Check my Mods page for instructions on how to do that.