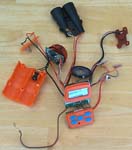

On the left you see the guts of an LTTO Drone. In the center is the base of the Starbase shell. On the right is the guts of the Starbase. Anyone want the Starbase guts? ;-)
LTTO taggers all have games that require the use of a tagger as a "Zone" tagger. This is all well and good, but the tagger isn't designed to be put down on the ground and expected to stay upright. In the Worlds of Wonder days of Lazer Tag, there was a product called the Starbase. It was a simple thing that could take hits, launch tags in a limited area, raise shields, and end a game based on number of tags or minutes. After discovering how fickle the Starbase was with Lazer Tag signals and how it didn't like to take tags from the LTTO Drone tagger in WoW mode, I decided to go ahead with my original plan to replace the guts of a Starbase with those from an LTTO Drone, which has all current available Zone type games in its programming.
The first task was to remove the guts from each device. They each have their quirks, especially the Drone with all it's tiny little screws and the way the lens assembly is assembled. After a little wranging with each device, I managed to get all the guts out of each:
On the left you see the guts of an LTTO Drone. In the center is the base of the Starbase shell. On the right is the guts of the Starbase. Anyone want the Starbase guts? ;-)
After getting all the parts out, I had to determine exactly how well the Drone guts would fit into the Starbase shell. By a stroke of luck, the LCD panel from the Drone fit remarkably well where the LED panel on the Starbase was. A little plastic trimming and it fit perfectly. The Drone keypad fits a little less perfectly in the trapezoidal hole that used to hold the Starbase's big red button. I also made use of the little red button and one of the switches of the Starbase's control panel for the trigger and indoor/outdoor switch from the Drone.
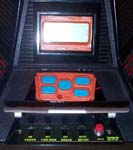

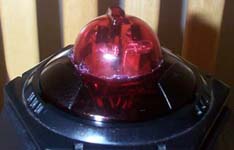
You can see that there are openings to either side of the keypad. I may or may not cover those at some point. The LCD and keypad are held in place by superglue. For the dome, I first drilled a hole in the center of the Starbase's dome, then used a nibbler to make the hole big enough for the Drone's dome to come up through the center of it. I was going to smooth out the hole, but I stopped nibbling at the perfect size hole, so decided not to risk making it too big by grinding it down more. The Drone's dome is held in place with, yeah, superglue.
Some quirks of the process: The receiver coil in the Drone guts is connected with some pretty brittle wire. Not only did the thing fall completely off during the transplant process, but also it started to break off again while installing the parts into the Starbase shell. The wire itself was being bent and broken, not the solder. After carefully getting the dome situated, I hot glued the heck out of that coil just to the inside of the Starbase shell near the dome. I hope I never have to take it apart. ;-)
To get the proper current to the Drone guts, I had to take a charge off of the center battery crossover on the Starbase's battery compartment lid. With some strategic plastic trimming and some careful soldering of a wire onto that crossover (connector, lead, whatever it's called), I lead that wire through an opening on the hinge side of the battery compartment, and to the appropriate wire for the Drone parts.
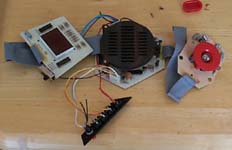
There were quite a few dangly bits that I didn't want to remove only to have to replace with some appropriate resistor or something. So, for things like the speaker and the lens assembly (this nifty module that holds the lenses, IR LED emitter, and IR receiver), I simply hot-glued them onto the inside of the Starbase shell.
It was a little tricky to wire in the little red button as the trigger and one of the switches as the indoor/outdoor switch. For the trigger, I decided to just patch in the wires to the button and leave the trigger IC still connected. For the in/outdoor switch, I desoldered the old switch and wired the new switch in its place.
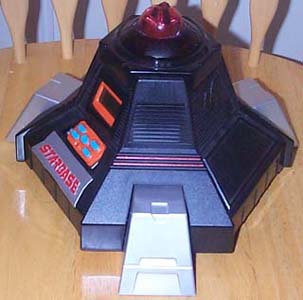
Overall, I think this was a fun project. Honestly, if I can do it, so can anyone else that likes to take things apart, and has a steady hand with a soldering iron. I'm certain that there will be an LTTO "Zone" product at some point in the future, especially if LTTO keeps selling well. But, I like the style of the Starbase, and enjoy having the first dedicated LTTO Zone tagger around. :) Here's a pic of the completed "LTTO Starbase."