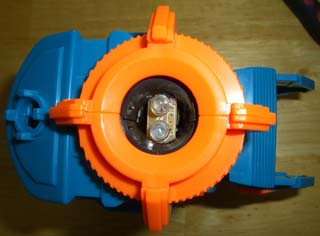
Lazerbait gets the award for the first person to actually perform this mod, though it was discussed by many people in the months approaching the release of the Phoenix LTX set. Simply put, you move the guts from a Shot Blast attachment into the shell of the video game attachment. Since most people have little to no love for the video game, the attachment provides a useful shell and connector for modding purposes. This mod is even easier, as the board from the Shot Blast is much smaller than the video game board, the connector is the same and is a direct swap, and the video game attachment already has a simple lens assembly that can be modded. The video game accessory is likely to be the home for a variety of mods, and I'll put them on this site as I do them, or people send their photos and descriptions to me.
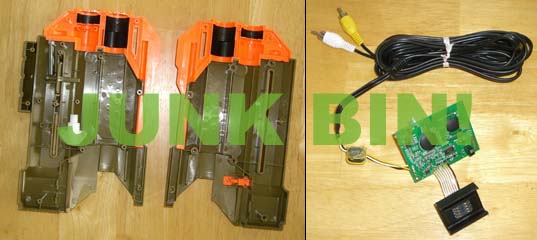
The first step is to disassemble your chosen donor Shot Blast attachment, and your recipient Video Game attachment. If the video game holds any interest for you, be sure to wait for this mod until you have more than one unit so that you can keep one and mod any others. Completely disassemble the Video Game unit, and organize your parts and screws nearby. Same for the Shot Blast attachment. Once you get them all apart, you can set aside the Shot Blast casing into your junk parts bin for future use. Before you do the same for the Video Game guts, cut off the three buttons so you can use one or more of them in your mod. Be sure to leave lots of wire on them. Cut them close to the Video Game board, since you're unlikely to use that again. Also, cut off the button for the Shot Blast at about the halfway point. You'll want wire left on both parts for future use. Put the rest of the Video Game guts into your junk parts bin. Do NOT throw these parts away! They might be useful in a future mod, especially the specialized connector from the Video Game guts.
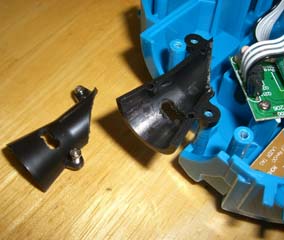
With your Video Game unit parts in a row, take the two black pieces of the emitter cone and grab your nearest rotary tool (e.g. a Dremel). You want to do two changes to the cone. First, using a cutter disc or something, just cut off the back end of the cone at an angle behind the two screw posts. You want to keep the screw posts so you can mount the assembly again, but removing the extra plastic at the back gives more play for the wires going from the LEDs to the board. Next, using a carving bit of some kind, dig out a slot from both halves, just behind the two little pegs or the little holes. You'll want a slot in the center of each piece as shown in the photo to the left.
You might need to tweak your slots a little. The goal is to put the double-LED board from the Shot Blast guts into the two slots in the Video Game emitter cone, holding them in place near the front of the cone. Try to keep it snug. If you make the slots too big and the LED board rattles around a lot, you'll want to wrap some tape around it, or put on a couple drops of hot glue to hold is in place inside the emitter cone. Once you've got the back of the emitter cone cut off, and the slots cut in each piece toward the front, the mod is practically over and you can begin assembling the other pieces.

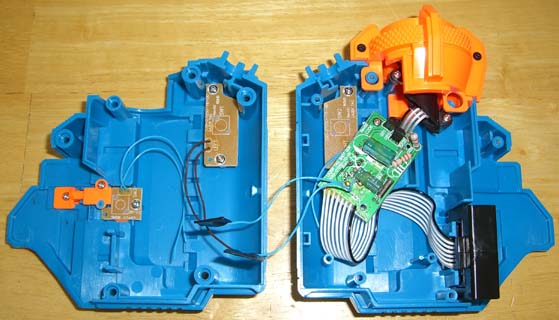
If the buttons are all still out from your earlier disassembly, put them back into their appropriate locations. Even if you don't use them all, it's best to have them there to plug the holes and to prevent loss in case you decide to put them to use later. Put the special connector in the same spot the one for the Video Game guts were. Remember that the black wire is in the front. The shell won't even close properly if you put it in backwards. Finally, strip the wires from where the Shot Blast's button was removed, and the ends of the wires for the button you want to use for your Shot Blast loading, then splice them together. There's no polarity to worry about, so just connect the wires and insulate them with electrical tape. If you want to solder them too, go for it, but I decided that a good twist and tape was enough for me.
That's it! Mount the Shot Blast board to one of the old board's mounting posts. I used the one nearest the emitter cone, but I had to remove the little alignment pins to make it lay flat and fit. The one thing I didn't do for my mod was cut a small round piece of clear plastic or acetate to replace the lens from the Video Game emitter cone. I just removed the lens to prevent any strange focusing of the beams. The LEDs are set back from the end of the cone, so the only way something could damage it is if a sharp object came in directly from the front. Putting the original lens back in might not have any real adverse effect with such a short-range purpose anyway, but having something protecting those LEDs isn't a bad idea. Once you get it all together, give it a test, and enjoy your new mod!