The Inexpensive Deluxe Sight
One of the greatest downfalls of the LTTO Deluxe tagger is its un-intuitive sights. Rather than being natural and noticeable on the top of the tagger as a new player would expect, they are an afterthought tacked onto the left side. Ironically, they are the most accurate of the "iron sights" on the 3 LTTO taggers, but since they are on the side and so small, most people don't even see them, let alone use them. The 2-Pack Accessory Kit, therefore, was highly sought after by clubs and serious players, because the included "Virtual Scope" made aiming the Deluxe much more intuitive and accurate. Alas, the market did not bear out the success of the Accessory Kit, and so Hasbro stopped making it, resulting in them being even more desireable to serious players.
Since the Virtual Scope was no longer available, players have sought an inexpensive replacement for it. The problem with finding a solution is that the Deluxe Scope rail is slightly larger than a 20mm Picatinny rail, and the "bump" just behind the rail created by the screen on the tagger created a clearance issue. The rail was also very short.
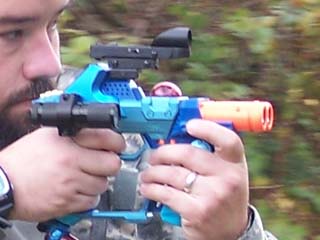 |
Fortunately, with a little help from my friends, we've found a simple, inexpensive solution that requires very little modification of the tagger to use. This photo shows the complete solution in action. |
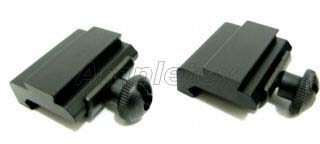
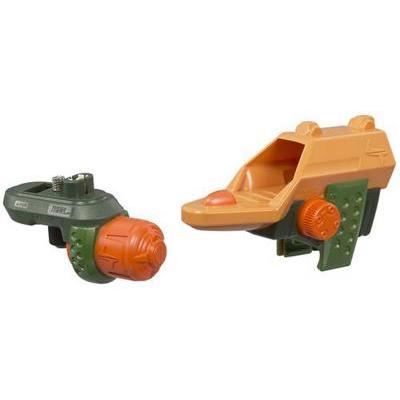
For starters, you need this base mount adapter. This one is a 11mm Scope Rail to 20mm Rail Base Mount QD Adaptor from Ampletex found on eBay. There are probably other brands or dealers/stores that have this type of adapter, but we haven't found them yet. The item link might be dead a while after I write this, so follow the store link and go to the "Mount & Ring" section. There are usually a couple Buy It Now auctions for a PAIR of these. They're based in Hong Kong, so the shipping is a little high. The pair with shipping is about $16, so you're talking $8 per adapter. |
 |
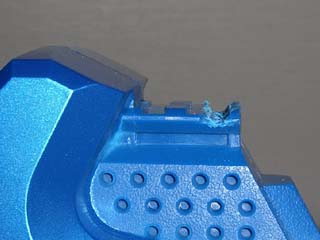 |
The next thing to do is the actual "mod" of the process. Because the base mount adapter was designed for real guns (and airsoft), the bolt is designed to rest in a notch on the rail. Since the LTTO rail is not meant for real gun scopes, it does not have the type of notch that the adapter needs. You have to MAKE a notch big enough for the bolt to fit in so that the adapter rests flush on the rail. I used a Dremel rotary tool with a sculpting bit to dig it out deeper. I imagine someone could use a drill bit, a round file, or even some kind of whittling or wood carving tool. However you can get it done, make the notch just behind the front edge of the rail. You'll see where the notch should be when you get the adapter, and you'll be able to test it and make more adjustments as you carve the notch out. |
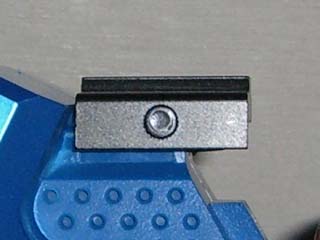
| With the notch well carved, attach the adapter and tighten the nut securely. |
 |
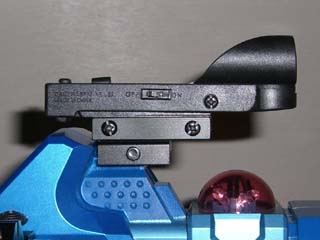 |
Once the adapter is secure, mount the scope. I used a Daisy Electronic Point Sight designed for air guns of all kinds. It fits the 11mm rail on the top of the adapter perfectly. I got my sight from Wal*Mart for about $9, bringing the total cost per tagger to $17. While more expensive than the original retail of the 2-Pack Accessory Kit, it's less expensive than what that goes for on eBay these days. It's also more accurate and easier to use, since it doesn't require lining up the dot with the crosshairs. A "real" red-dot sight like this one requires only that you put the dot on the target. |
The only thing left to do is "zero in" the scope. That just means make sure it's accurate. My method is to take the tagger with the scope and another tagger out to my back yard. I start them up in LTAG mode, and set the other one up at one end of my yard, then go to the other end with the one I'm zeroing in. Using the LTTO lock-on function, I make sure I have even amounts of "lock-on" above, below, and to each side of the target tagger. If there's more area of lock-on to one side, I adjust the sight the other way, and so forth. Once I get an even circle of lock-on around the target tagger, then it's a safe bet that the sight is accurate enough for LTTO.