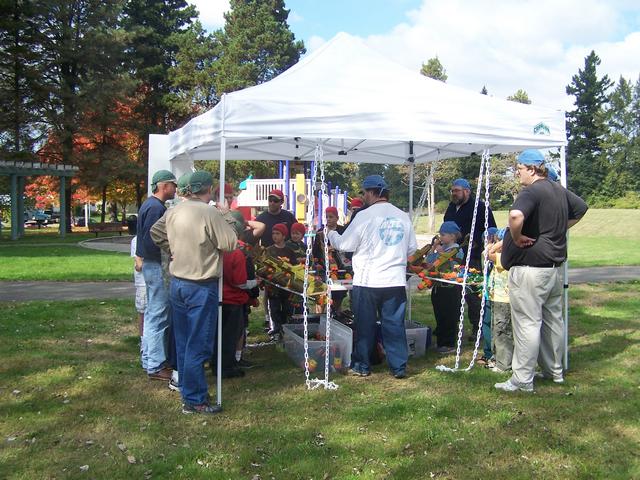
The Hosting Station
PARTS
- EASY UP Canopy. It doesn't matter what brand, kind or size, really, as you'll have to figure out how and where to hook things up yourself. Just don't waste time and money on anything but a quickly deploying canopy, the kind with scissor mechanisms to expand, you know? I paid $200 for a big fancy one that I love, and Peter has been using smaller $50 ones for a while. The most important thing is that you're not wasting tag time with putting up the canopy. ;-)
- A LOT of plastic chain. Get the heavy stuff, imho, or at least bring one of the shelving rails (below) over to the chain to make sure a rail will fit INTO a chain link. In my old design, I was using 6 16' lengths of the stuff, but it was overkill. It's not expensive stuff, though, so I'd recommend getting more than you think you'll need. My new design uses only 4 of those 16' lengths, and I haven't shortened them to what I can really get away with.
- Two modular shelf rails per tagger rack, whatever length you want, but generally get the longest you can find. By "modular shelf rails" I mean the rails that you screw up against the wall at the studs, then put "arms" into that the shelves themselves actually rest on. The kind I used have single slots for flat "arms", and I believe that's what Peter used as well. I chose white, he chose black, but we are the world, you know? Color doesn't matter. ;-) Note that the long rails are often slightly warped or bent from being in the store a long time, so don't be afraid to take them all down and look directly along the rail so that you can pick the ones with the least warping, just like one would do with lumber. The longer the rails, the more taggers each will hold. You don't NEED them to be able to hold more than 8 if you plan to do one rack per team, but it's also nice to have some elbow room between the taggers so that people aren't crowding around a small group of taggers. As such, I recommend getting the absolute longest ones the store has. Get 6 of them if you plan to make 3 complete racks.
- Dowels. Peter went with normal round ones, but to make mine, you need the square dowels so that you can interconnect them like I do in order for players to use Deluxes, IRT-2Xs, and TMBs as they desire. Get the 1/2" square dowels. I think they come in lengths of 3', but they might be 4', I forget. You'll need a bunch. Like 4 or 5 per long rack.
- 4 to 6 medium sized carabiner clips. These are what you'll be using to hook the chains to the underside of your canopy. They need to be large enough to hook through 4 links of the plastic chain you get. Depending on your final hanging method, you might get away with smaller ones, but IMHO better safe than sorry.
- A bag full of zip ties. 8 inch should be long enough. You'll be using these to prevent the chains from slipping off the ends of the shelf rails. You don't need a lot, 'cus you don't have to actually zip them together, but having extra is a good thing for when kids decide they need to be zipped and you have to cut them off to break down the station.
- Some landscaping pins/staples or tent stakes. You'll need these to hold the chains down to reduce the swinging of the racks. I haven't had a tagger fall due to swinging yet, but I hate seeing them swing anyway. :) Make sure whatever you get can go through a chain link or has a hook that can go through it.
- A roll of stair grip tape, or some other thin but very rubbery/high-friction, sticky back stuff. This will be used on the rails and dowels to prevent the taggers from slipping sideways and falling through the openings. I tried door/window insulation strip, but it was too thick and the taggers were hard to set in right. The stair grip tape needs to be cut into strips, but it works so much better, that I can't think of anything better to recommend.
- Small wood screws. These need to be small enough to fit the screw holes on the shelf rails, and long enough to hold into the dowels well. I think I went with 1/2" or 3/4" flat head wood screws.
MAKING IT
- Take about half your dowels and cut as many lengths of 8-1/4" that you can. These will be the main separator for the rails. If possible, pre-drill holes into both ends of each piece, especially if the wood is fairly dense. It will make assembly go faster, and prevent splitting the dowels.
- Align a dowel with the screw hole at the end of a shelf rail on the INSIDE of the rail, and screw it together. There should be an inch or so of rail beyond that screw hole, which we'll use to hang the rail on the chains. The square shaped dowel should fit perfectly inside the channel of the rail and prevent it from spinning as you drive the screw from the outside of the rail. Be careful, though, as sometimes the wood is soft, and the screw will strip the wood and not hold properly. If you have a driver with a torque setting, start with a low torque and move up until it drills in tight but not strip the hole. If you're doing it by hand, go get the IcyHot ready. ;-)
- Repeat step 2 with the opposite end of that rail. Then, with a second rail, put it onto the dowels and screw it together. Make sure the holes line up all the way down the rails. Sometimes the holes are offset and you need to make sure you have the rails pointing the same way (though turned around so that the channels face each other) so that all the screw holes line up. You should have a VERY long rectangle at this point.
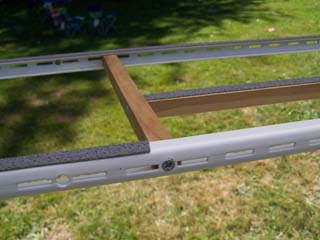
- Now, place a piece of dowel at every pair of screw holes along the length of the rails. We will call these the "spanner dowels." We want it to be stable and resist twisting, especially during transport and assembly. Your rack will look a lot like a ladder for small Narnian animals at this point.
- This is where things get a little trickier. With your ladder on the bench, decide how many of those smaller rectangles you've just made with the spanner dowels will be spots for IRT-2X taggers. Note that you can't have two IRT-2X areas right next to each other. It's best not to, anyway. The fully open spots will hold Deluxes and TMBs (you'll see). But drones will fall right through way too easily. With one of your IRT-2X spots in mind, measure the distance between the two spanner dowels on either end of that spot.
- Cut another piece of dowel equal to the distance between the two spanner dowels and pre-drill each end.
- Measure 5" from the edge of the rail across one of those spanner dowels and mark that spot. Do the same thing on the other spanner dowel for this IRT-2X section. Now, carefully drill pilot holes through the SIDE of the spanner dowels at the 5" mark. Of course, getting things as near to center as possible is a good thing. Also, it's likely that you'll need a smaller drill to get in there and drill in straight. If you want, you might try drilling these holes before you put in the spanner dowels. Just remember to drill them at 5-1/2" from the end of the spanner dowel, and to be aware of the location and orientation of that pilot hole when putting your spanner dowels into the rack so that they're all facing the right direction and at the right side of the rack. ;-)
- Finally, take your IRT-2X spot piece and screw it into place by wedging it between the two spanner dowels bordering the area, and driving the screws *through* the sides of the spanner dowels and into the ends of the IRT-2X spot piece.
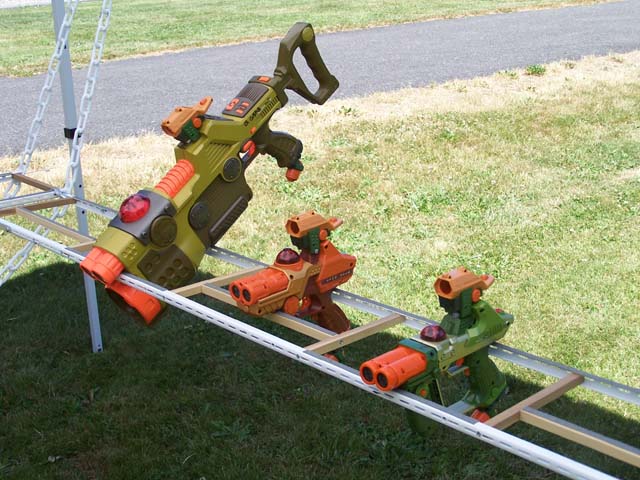
- Repeat steps 6-8 for each section you want to use for IRT-2X taggers. As mine was made before the TMBs came out, I have equal spaces for Deluxes and IRT-2Xs, and the TMBs go in the spare Deluxe slots. You should decide how many of each kind of area you have based on the makeup of taggers used in your group. Just remember that TMBs and Deluxes need the fully open sections, and only IRT-2X can go in the spots that have the additional piece going across them.
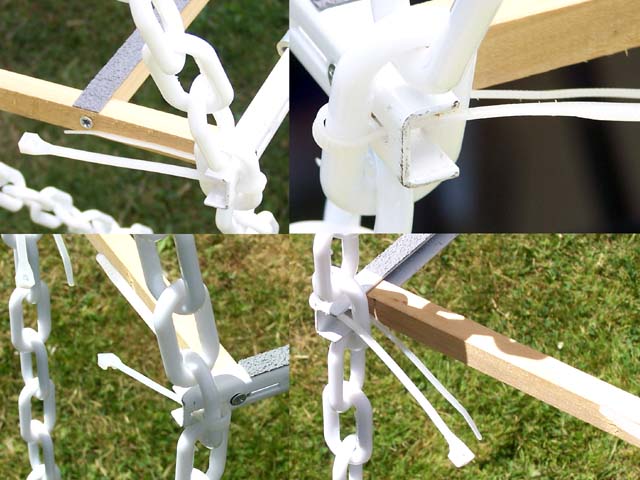
- Once you've got all your racks put together with the space arrangement you like, you need to prevent slippage of the taggers. If your non-slip material is wider than about 3/8", then you'll need to cut strips of it. You'll also probably need a nice strong pair of shears. I used leather shears, but anything stronger than normal household scissors should be ok. Basically, you need to cut strips as wide as the dowels and/or shelf rails, and as long as the bits of rail and dowel that the taggers will be resting on. On the player side, that means the entire length of the rack. On the host side, that means the shorter area that the front of the tagger will rest on. For the Deluxe and TMB spots, that's the other shelf rail. For the IRT-2X spots, that's the dowel that goes between the spanner dowels. Note that for the IRT-2X spots, you should cut the non-slip strip to go onto the spanner dowels themselves to prevent rotation of the dowel the IRT-2X will rest on. The rough-looking gray material in the photos above is the non-slip strips I used. FINALLY! The racks themselves are done! (well, V1.0 anyway. ;-)
- Put your canopy up in the back yard and learn how to do it alone, 'cus you can't always rely on help.
- Cut your plastic chain into 16' lengths, two for each tagger rack.
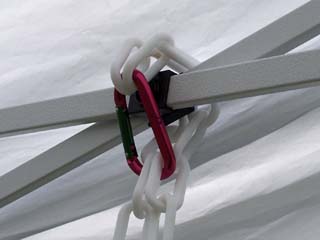
- Take your carabiner clips, your chain, and your tagger racks out to your canopy and start to experiment! :) Peter does his differently than me, so again, the way you do it will depend on your canopy, chain, clips, and what you like. What I do is put both ends of one chain onto the carabiner. I put that OVER the expansion mechanism at the eave of my canopy, and then hook the carabiner back onto the chain. I usually count 5 links and then clip it to those. This is why I recommended a carabiner that can have up to 4 links on it. I then count down about 30 or 40 links for where my rack will be...
- To attach the racks to the chains, put the stubby little end of each rack rail into one of the links of the chain. If it's really loosely in the link, you'll need to have your zip ties at the ready (i.e. in your lips ;-). If they fit snugly, then you can probably get both rails into a link before putting on the zip ties. As you recall, I mentioned that the zip ties don't get zipped. Notice that at the end of your rails, there is usually at least one slot for the shelf system's arms to hook into? Well, make sure your chain link is pushed as far into the rail as possible, up against the spanner dowel on that end. Then, put just over half of the zip tie through the slot in the rail that is open. I usually go from the inside out with this step. Then, slide the chain link away from the spanner dowel up against the zip tie, and put the zip tie BACK through the slot in the rail on the OTHER side of the chain link. Repeat the zip tie thing with the other rail, then repeat this entire step with the other end of this rack, and each end of your other racks.
- The placement of the chains on the canopy, the links you hook the racks into, and everything else will be up to your experimentation.
- Once you're satisfied with the location, level, and height of your racks, it's time to stake them down. This is why you used 16' lengths of chain. It's way more than you need to just hang the racks, but it gives you enough to tie each rack to the ground to reduce swinging and increase overall stability. Simply stake each end of the chains down to the ground. You can bring them straight down and leave excess chain lying there in a small pile, or you can bring the chain toward the other end at an angle. Whatever you like! A mallet, of course, will be handy for this job. :)
I might have glossed over the setting up stuff a bit, but I think it really does depend a LOT on what kind of canopy you have, how thick the chain is and how big your carabiner clips are, as well as how big your racks are and even the average age/height of your players. :)
I hope this was helpful to anyone considering a hosting station like mine or Peter's. I'll try to take some pics of the more convoluted things to help make them make more sense. :)
Version 1.1
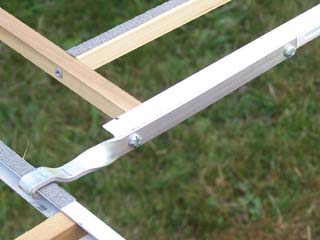
I've updated my rack a little since the creation of it. I got tired of having three independantly hanging racks. To decrease setup time, and increase the overall stability of it, I've come up with a way to temporarily "hook" the three racks into one connected U shaped unit. I looked high and low for some device out there that would let me quickly attach and detach the rails to each other, while being stable when attached, but was not able to find anything suitable. My solution was to fabricate something. As you can see in the photo below, I took lengths of flat aluminum and bent and twisted them into the shapes I needed. There are two hooks like this at one end of two of my tagger racks. These hook onto the inside rail of the third rack, which is the bottom of the "U" shape. In this configuration, I need only use 4 lengths of chain. Two to hold up the main rack, and one each to hold up the free end of the side racks. This configuration also results in a smaller area for the taggers around the host, which helps reduce hosting and debriefing errors. It also helps keep the kids from walking into the center between the rack ends. :)