HandyShopper User's Guide: Sharing Lists

One of the most enjoyable aspects of using the HandyShopper program is being able to share lists. Many people have uploaded their lists for others to download, and many more enjoy those lists, especially to get a head start on their own personal lists. This section will provide instructions on downloading and installing lists, and even locating and uploading lists you've created.


Find a New List to Try
Download the List
Install the List to your Palm Powered Device
Modify and Use the List
Rename Your List
Find Your List
Upload One of Your Lists
Beam Your List to Another User

Find a New List to Try

Shared lists are stored in the Yahoo! Group Files archive. Just follow the link in the first step below to get to the top level of the Files area of the group, and go from there. If you need specific help, just follow these instructions:
  1. Access the following URL with your preferred web browser, such as Netscape Navigator, or Microsoft Internet Explorer, or even Opera: http://groups.yahoo.com/group/handyshopper/files/
  2. Click the link to the file named "-File Listing-.txt" (the name of the file is the link to the file). Your browser will download this file and display it to you.
  3. Read through the files described to find one or more HandyShopper lists you'd like to download and try.
  4. Take note of the name of the folder the file you want is in. Folders are indicated in the list by the [] characters. The folder that a particular list file is in, is named and described above where the list file is named and described.
  5. Click the "Back" button on your web browser to return to the File archive main page.
  6. Click the name of the folder that the list you want to download is saved in.
  7. The list you want should be available for download on the browser screen at this time.

Download the List

Once you have located the file you'd like to download (see above if you need help finding a file), follow these instructions to download the file for future installation to your Palm Powered device with HandyShopper.

    Figure 3.1
  1. Click the name of the file to initiate the download of that file.
  2. In some browsers, a window will be presented which asks what you would like to do with the file. For users of Microsoft Internet Explorer (MSIE), the options will be to open the file or to save it. Choose the save the file, and click the OK button.
  3. In most cases, and after the choice has been made in MSIE, the web browser will present a "Save As..." window (Figure 3.1) for you to choose the name and location to save the file you are downloading. Please choose a location on your hard drive that will be easy to remember. The "Add-on" folder in the "Palm" folder is a logical choice if it exists, but as long as you can find it later, anywhere is fine. It is best to leave the name of the file unchanged.
  4. Click the "Save" button to save the file to your computer's hard drive (or wherever you chose to save it).

If you were not presented with a window to designate the name and location to save the file, or were shown a screen full of nonsense characters or something else unexpected, please try the following.


    Figure 3.2
  1. On a Windows computer, click the right-side mouse button while pointing the arrow on the name of the file (do a "right-click" on the link to the file). On a Macintosh computer, click and hold the button down.
  2. A small list of options should appear (Figure 3.2) where the mouse arrow is on the screen. Among the options should be one called "Save Target As..." or "Save Link As..."
  3. Click on that option. The "Save As..." window should now be presented, and you can follow the instructions above to save the downloaded file.

Install the List to your Palm Powered Device

IMPORTANT! Please verify that the list(s) you want to install has a unique name among the HandyShopper lists already on your device. If a new list is installed that has the same name as one currently on your device, the one being installed WILL overwrite the one on your device. Please check your device before HotSyncing the new list onto it. If you have a list with the same name as one that is being installed, please refer below to Rename Your List.

As soon as you have the list on your computer somewhere, either on your hard drive, or even saved to a floppy or other media, just install it as you would any other Palm OS file.

    Figure 3.3
  1. On Windows based machines, when the Palm Desktop software is installed properly, the .prc and .pdb file extensions have been assigned to the Palm Install Tool. As such, all you need to do is double-click the file, and it will be automatically listed in the Install Tool, and installed during your next HotSync.
  2. If nothing happens when you double-click the file, or if you get an "Open with..." window asking you to pick the program to open the file with, or especially if some application tries to open the file (Print Shop Deluxe is one that often does this if installed) then you'll want to use the Palm Install Tool itself.
  3. Run the Palm Install Tool (Figure 3.3), either by running the program directly, or by running the Palm Desktop software and clicking the button to run the Palm Install Tool.
  4. If more than one Palm Powered device connects to your computer, be sure that the user chosen from the User list in the Install Tool is the one you want the HandyShopper list to be installed to.
  5. Click the "Add..." button to add a file to be installed.
  6. Locate the file you want to install using the Open... window that popped up.
  7. Double-click the file to have it added to the Install list.
  8. Click the "Done" button to complete the process of preparing it for installation.
  9. HotSync your Palm OS device to install the file to it for future use.

Another way to get a new list into your Palm Powered device is directly onto expansion card media. HandyShopper supports the VFS technology that Palm Powered devices use to access data in expansion cards such as Compact Flash, SD/MMC, and Memory Stick media. HandyShopper will only look in one place, though, to speed up the search process, which is great for large cards. The location on the card that HandyShopper will look for and in, is: /Palm/Programs/HandyShopper/. Using a media card reader attached to your computer, you can simply save the list file(s) into that folder. Then when you put that card into your Palm Powered device and run HandyShopper, you'll be able to choose that list from all the others in RAM and on the card. Of course, for devices that don't have expansion card slots, the only way to get a new list into it is via HotSync... or e-mail... or beaming... or.... ;-)


Modify and Use the List

The next time you run HandyShopper on your Palm Powered device, you can use your new list. To find and open the new list, simply tap the arrow next to the name of the list you're currently viewing at the top-left of the screen. A list of all the lists in your device will appear (Figure 3.4), and you can choose the new list from there. Simply tap the name of the new list to open it. Lists with icons assigned to them will have their icons displayed to the left of the list name. Lists found on an expansion card will have a special "media card" icon next to them so that you know they are on the expansion card. You can then view the list, make any changes you need, and generally use it as you would any other list. Keep in mind that lists stored on the expansion card will be copied into RAM for viewing and editing, then copied back to the card, if you've made any changes, when you exit or switch to another list.
Figure 3.4

Rename Your List

It is often necessary to rename a list database you've created. Reasons include preparing to install or receive a list that has the same name, or preparing to share your list with other people. The best way to prevent accidentally overwriting someone else's list is to give your list a new and/or unique name. Unfortunately, renaming the database file on your desktop computer will NOT rename the database on the Palm Powered device. Please follow these instructions to properly rename a HandyShopper list.
  1. Tap the Menu silkscreen button or the title bar of the screen to open the HandyShopper menus.
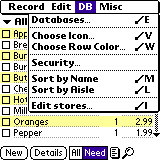
  2. Tap on the DB menu. (Figure 3.5)
  3. Tap on "Databases..."
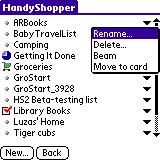
  4. In the Database Management screen that appears, find your database and tap the small triangle to the far right of the list name. This pops up a list of action options that can be performed on your list, including Rename (Figure 3.6). Tap "Rename..." and give your list a name that is different from any lists you might be installing (Figure 3.6.5). A common change is to add your initials to the end, e.g. Shopping_JSD
  5. When you are satisfied with the new name, tap the "OK" button to assign the new name to the current list database.
  6. Tap the "Back" button at the bottom of the Database Manager screen to exit the manager and get back to your list.
  7. Now you're ready to install a new list, beam your list to another person, receive someone else's list, or even upload your list to share with the world!

Figure 3.5


Figure 3.6


Figure 3.6.5

Find Your List

So, you're ready to share your list with the HandyShopper user group, or even post it on-line somewhere else, eh? Well, before you can do that, you need to know where to find the file to share!
  1. Please ensure that your list has a suitably unique name by referring to the instructions on how to Rename Your List. A name like "Groceries" or "Restaurants" is sure to be used by many people already. Make sure it's reasonably unique before you continue.
  2. HotSync your Palm OS device to make sure the most recent version of your list is backed up to your computer.
  3. After HotSync is complete, browse the contents of your desktop computer's hard drive. On a Windows machine, your backup files are most likely stored in C:\Program Files\Palm\username\Backup, where username is your HotSync ID. Sometimes, a long HotSync ID is converted to a shorter one, such as from "John Doe" to "DoeJ". Sometimes the "Palm" part is the brand of your device such as Sony or Handspring, and sometimes that folder is inside the "Program Files" folder as well, so if you can't find it at that exact location, check a couple of those other possible locations.
  4. Open that folder/directory.
  5. Review the files in that folder. Your HandyShoper list will have a file name similar, or even identical, to the name of the list on your handheld. The most common difference is that spaces in a list name are often replaced by underscores in the file name. Also, current versions of HandyShopper will prepend "HS2_" to your list name. All lists created or renamed with the current version of HandyShopper will have this naming convention. Lists created on older versions, and not renamed since, will not have the HS2_ in front of the list name. Do NOT add HS2_ to the file name if it is not already there!
  6. You've found your list! Now you can copy it to a floppy disk, send it via e-mail, or even upload it to a web site, such as the HandyShopper group file archive.

Upload One of Your Lists


Figure 3.7
If you've enjoyed downloading and using lists other people have shared, you might want to give back to the HandyShopper community by sharing a list you've created, or even one you've enhanced from a previously shared list. The fastest and easiest way to do that is to upload your list to the handyshopper group file archive.
  1. Access the following URL with your preferred web browser, such as Netscape Navigator, or Microsoft Internet Explorer, or even Opera: http://groups.yahoo.com/group/handyshopper/files/
  2. Review the list of folders where lists are saved, and choose what you believe is the most appropriate location for your list. If you aren't satisfied with the choices, feel free to contact the group owner to suggest the creation of a new folder.
  3. Click the name of the folder you wish to add your file to.
  4. When you are viewing the contents of the folder you wish to add your file to, click the "Add File" link at the top of the list. (Figure 3.7)
  5. The following page includes a form that you need to fill out to upload your file. This upload process requires a relatively recent web browser, such as Netscape or MSIE 4.0 or higher.
  6. In the "File Name" field, click the "Browse..." button to locate the list file on your hard drive. Read how to Find Your List if you need help finding it.
  7. After you locate the file, click "Open" to have the file location and name automatically entered in the File Name field.
  8. In the "Description" field, please enter a description for your file that will help others decide if it's one they would like to try. Anything that differentiates your list from others should be entered here.
  9. Do NOT check ANY of the "Auto-send to Members" options. We do not wish for any files to be sent automatically to list members.
  10. Please DO check the option marked "Send a message to the group announcing this file." We want list members to be notified of the availability of a new list.
  11. When the form is completely and correctly filled out, click the "Upload File" button to upload your file and have it added to the folder you chose.
  12. The next page your web browser displays will be that of the folder you uploaded your file to, with your file listed in alphabetical order with the others.

Beam Your List to Another User

The fastest and easiest way to share a list with someone else at this time is to beam it directly to them. While some third party launcher and file listing applications might let you beam a HandyShopper database, there's no need for these extra programs. HandyShopper has a built-in "Beam database..." feature. Follow these simple instructions to beam a list to another Palm Powered user via the Infra-Red communications port.
  1. Please ensure that your list has a different name than any of your friend's lists by referring to the instructions on how to Rename Your List. The last thing you want to do is accidentally overwrite someone's personal list just to beam them yours!
  2. Tap the Menu silkscreen button or the title bar of the screen to open the HandyShopper menus.
  3. Tap on the DB menu. (Figure 3.8)
  4. Tap on "Databases..."
  5. In the Database Management screen that appears, find your database and tap the small triangle to the far right of the list name. This pops up a list of action options that can be performed on your list, including Beam (Figure 3.9).
  6. Make sure your friend is ready to receive, especially if they regularly turn off the Beam Receive feature to conserve battery life.
  7. Tap the "Beam" item in the pop up list.
  8. Your Palm Powered device will commence the operation of beaming that list file to your friend's Palm Powered device. If all goes well, and there were no naming snafu's, your friend will be making use of your list within minutes.

Figure 3.8


Figure 3.9


©2001 Greg Gaub